
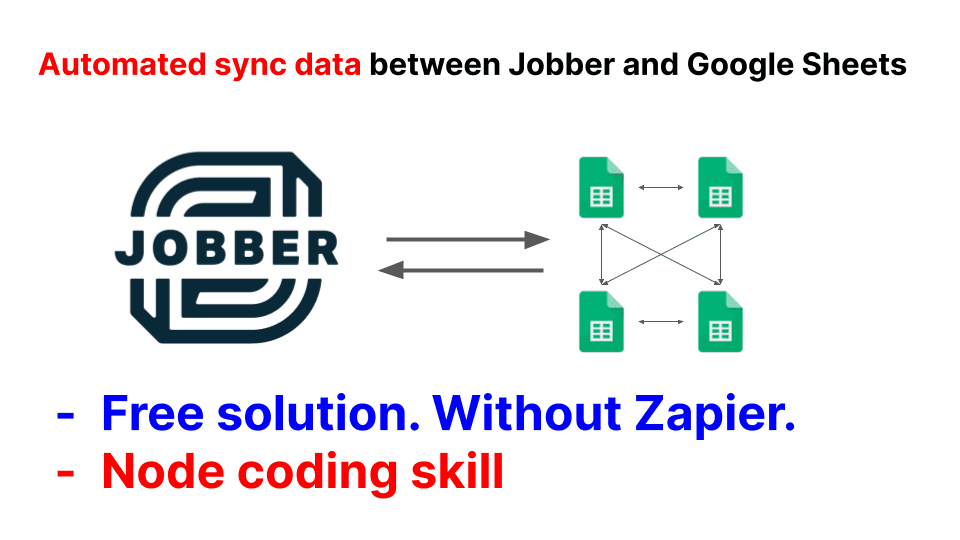
How to Integrate between Google Sheets and Jobber without Zapier and no-coding skill


This is a tutorial to help you to connect between Google Sheets and Your Jobber account. Without any coding skill or payment for Zapier, you can get it done.
Why connect between Google Sheets and Jobber
There are a lot of reasons why you should connect between your Google Sheets and Jobber. When the data between Google Sheets and Jobber are automatically sync, you will save a lot of time for business operation.
Below are just one in among of scenarios:
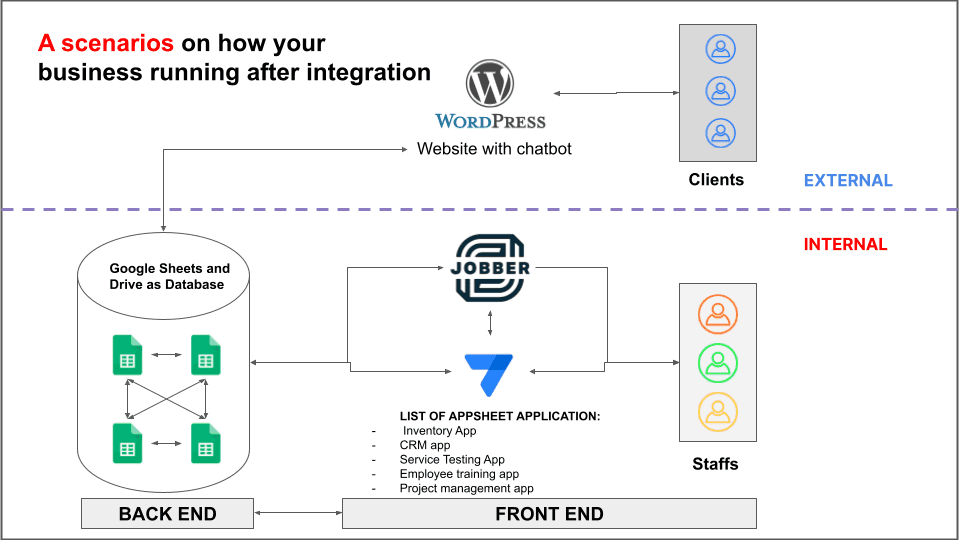
Scenario 01: Jobber is lacking inventory function and you are managing your inventory via Google Sheet. When connecting Jobber and Google Sheets, It is easier to manage your inventory.
Scenario 02: Jobber mainly is a business software management. It is good but it doesn’t provide a full function about CRM and you are currently using Google sheet and Appsheet app as CRM tool. When integrated between Jobber and Google Sheets, your team can collaborate better and it improves your business operation process.
What purpose of this tutorial
This tutorial may help you to save a lot of money as it gives you a free solution to connect your Jobber and Google Sheets. Below are pricing plan from Zapier for your reference:
| Free | Starter | Professional | Team | |
| Price: $/month, billed annually | 0 | 19.99 | 49.99 | 399.99 |
| Limitation | 100 task/month | 750 task/month | 2K task/month | 50K task/month |
| Update time | ||||
| Initial time to config (est for no-code skill person) | 20 minutes | 20 minutes | 20 minutes | 20 minutes |
So if you spend around 40 minutes following these steps with images and screenshot on this tutorial and to get your purpose done, why should you not try?
By the end of this tutorial you can automatically extract all your jobs on your Jobber account into your google sheet. See the video below for more detail.
It is an absolutely free solution. Let’s get started now.
You may want to read this: Build a automated quote system for Jobber business account that relied on Google Drive Gmail and Google Sheets
Preparation
Below are checklist you need to preparation:
| No | Item | Description |
| 1 | A Gmail account | Both free and G suite account are accepted |
| 2 | A Jobber.com account | It is your Jobber account with admin permission is required |
| 3 | A Jobber developer account | It is free. You can grab a new account within 5 minutes. |
Coding skill is NOT required. Just follow the steps in this tutorial and you will get it done.
Step 1: Working on your Jobber account
Step 1.1 Register a developer account on
Your Jobber account is separate from the Jobber developer account. To get the tasks done, You must have one Jobber Developer account. It is free. Click here to register.
It is very important to note that the email you use to register in a Jobber developer account (developer.getjobber.com) must be similar to the email you use to login to a Jobber account (Jobber.com). And the email must be set as administrator of your Jobber account.
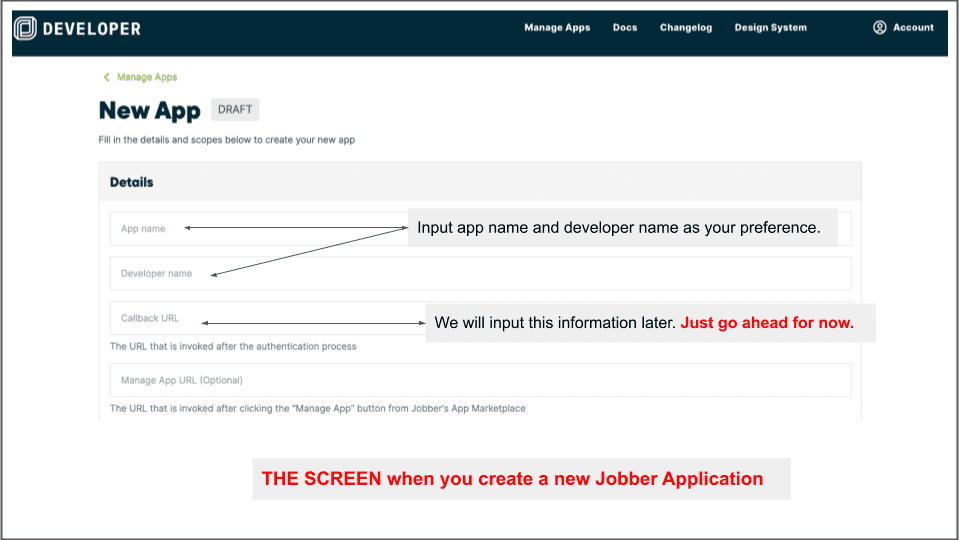
Step 1.2 Create an application and make initial set up for your new application.

Follow the instructions in the image above, you now can create a new Jobber application. After click on “new” button, you will see the screen as shown below:
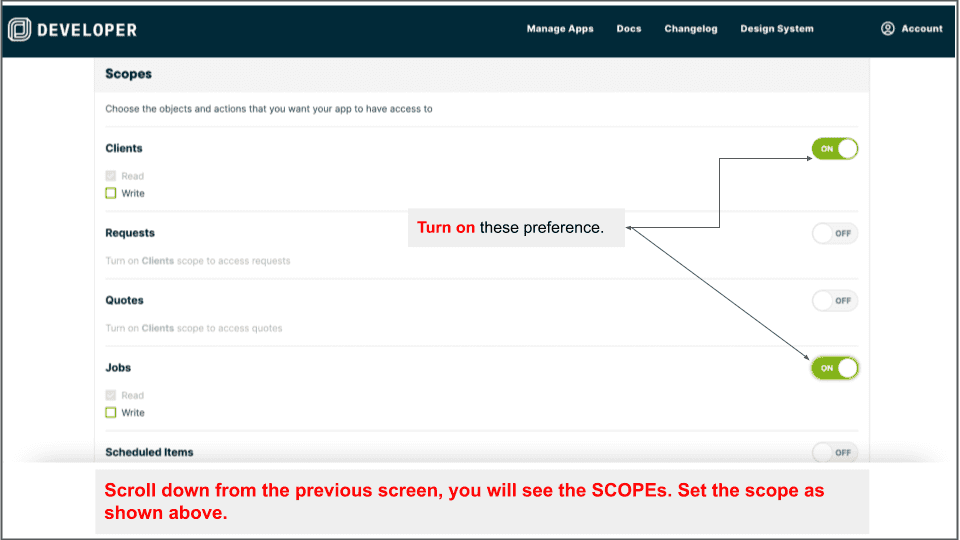
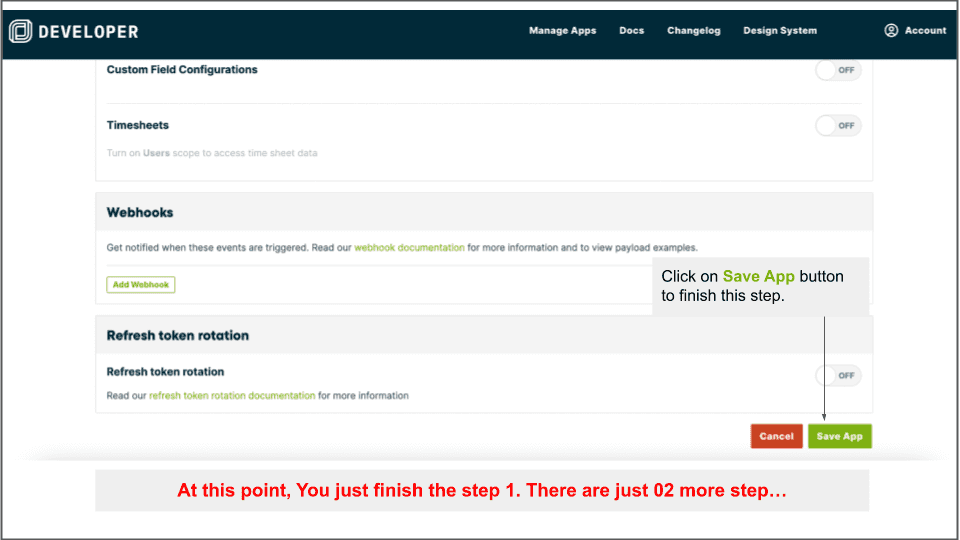
Scroll down the screen to go to Scope preference. See the image below for detail.
Keep scrolling down and hit the “save app” button as shown below.
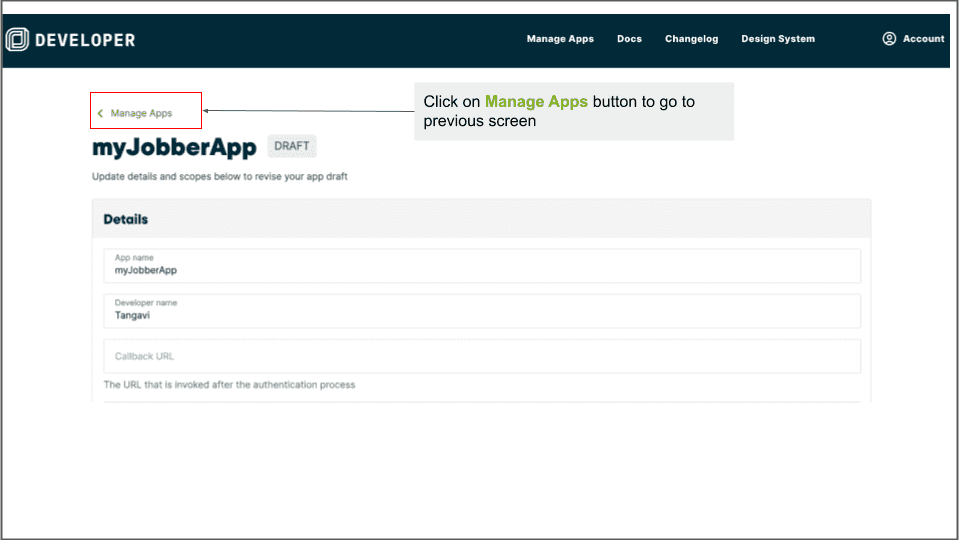
Now you need to scroll up and hit the “manage apps” button to go to the previous screen.
Step 1.3 Save the client ID and client secret
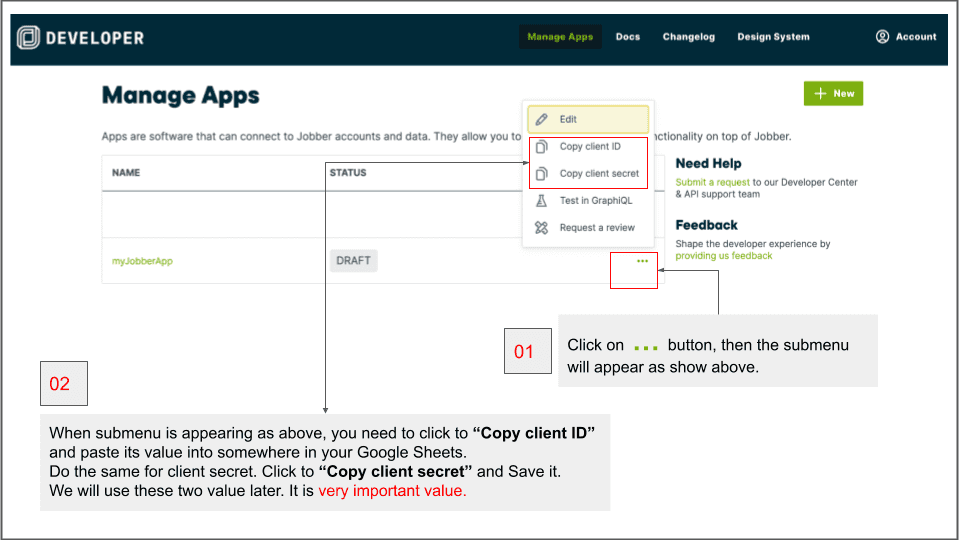
Follow the image above, you now have client ID and client secret of your Jobber Application.
Save these two values on your Google Sheets or somewhere as your preference. The client ID and client secret are very important values.
It values is similar like below:
Client ID: xxxxxx-yyyyy-zzzzz
Client secret: wwwwwwwwwwwwww
At this point, there are only two steps left when working with Jobber Application. These steps are:
- To input the Callback URL of Jobber Application. You will get a Callback URL after working on with Your Google Sheets.
- To config the Webhook of Jobber Application.
We will be back with these two steps after we finish working with Google Sheets. Let’s go ahead now.
Step 2: Working on your Google Sheets
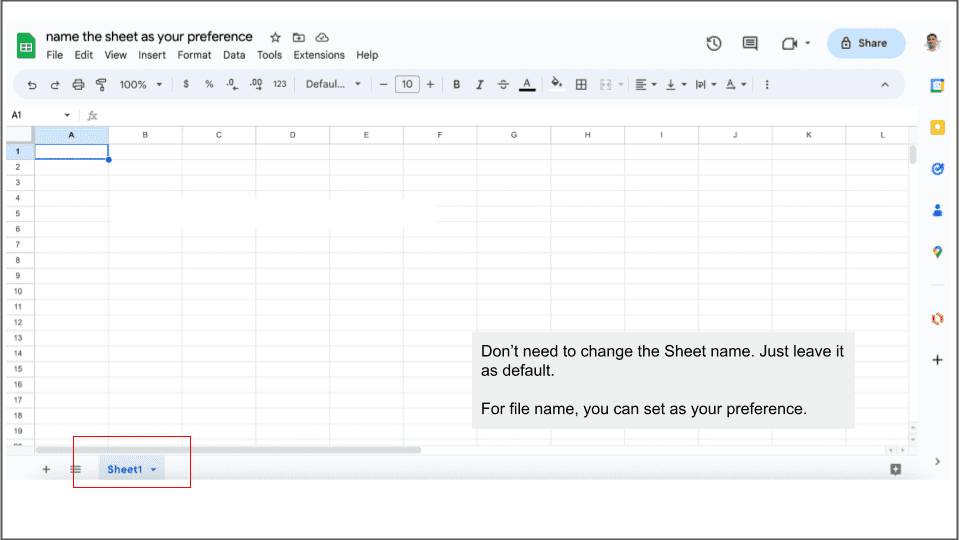
Create new Google Sheets file
Now, create a new Google sheets file. You can click here to do it now. When finished, you will see the screen as below:
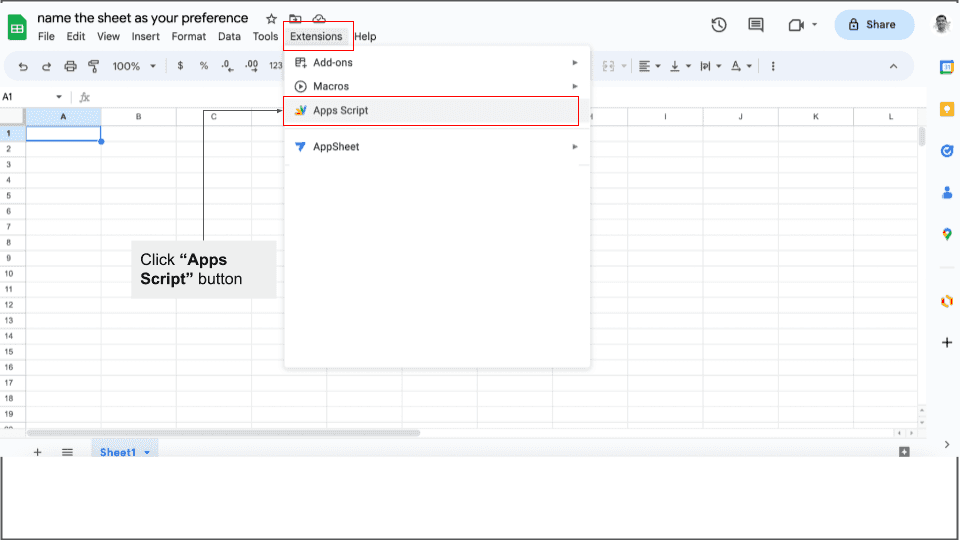
Open Apps script from your Google Sheets
Go to and click the “Extensions” button, then click “Apps script” button.
After that, you will see the screen as below:
Delete the default code and you will see the screen as below:

Set up the libraries and the code for authentication between Google Sheets and Jobber Application
To make an authentication between Google Sheets and Jobber Application, there are a lot of solutions. The easiest way is to use a Library named as OAuth2 for Apps Script. It is safe as It is provided and maintained by the Google team.
Now, copy the Library ID as below, then follow steps mentioned in the screen below:
Library ID: 1B7FSrk5Zi6L1rSxxTDgDEUsPzlukDsi4KGuTMorsTQHhGBzBkMun4iDF

If successful, you will be redirected to the previous screen and you will see a Tab named as OAuth2 which is shown below the Libraries (on the left of screen).
We now need to edit the appsscript.json” manifest file. Follow the instructions as explained below:
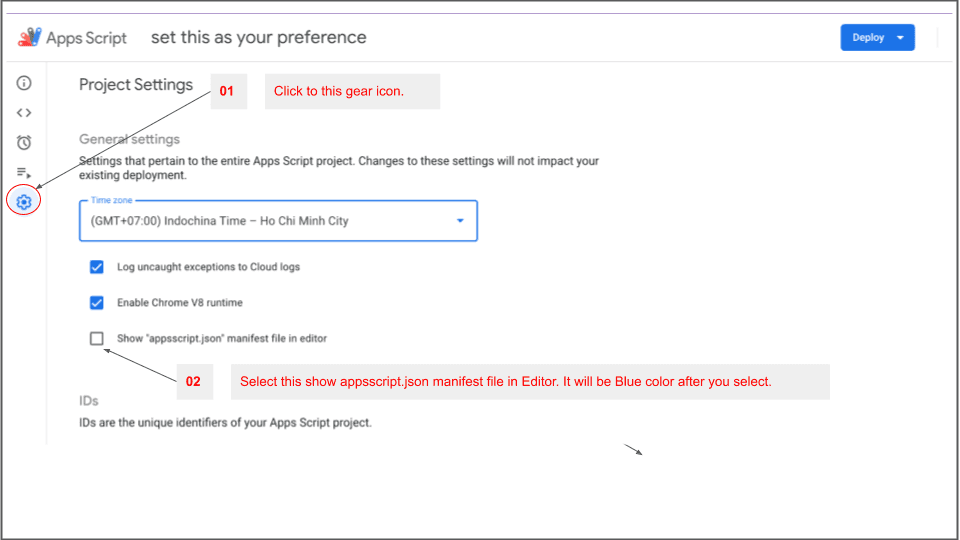
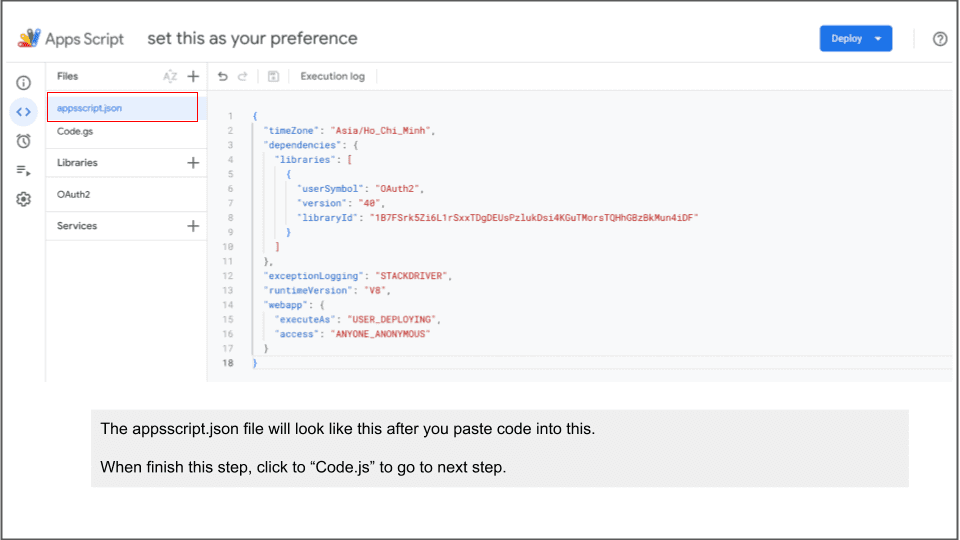
Now click to the ”< >” icon to go back to Apps script editor. You will see a file name as appsscript.json. This file is shown above the Code.js file. Click to go to the appsscript.json file.
Then copy the text below into appsscript.json file. When you finish, you will see a screen as below.
Text to paste into appscript.json file:
"timeZone": "Asia/Ho_Chi_Minh","dependencies": {"libraries": [{"userSymbol": "OAuth2","version": "40","libraryId": "1B7FSrk5Zi6L1rSxxTDgDEUsPzlukDsi4KGuTMorsTQHhGBzBkMun4iDF"}]},"exceptionLogging": "STACKDRIVER","runtimeVersion": "V8","webapp": {"executeAs": "USER_DEPLOYING","access": "ANYONE_ANONYMOUS"}}
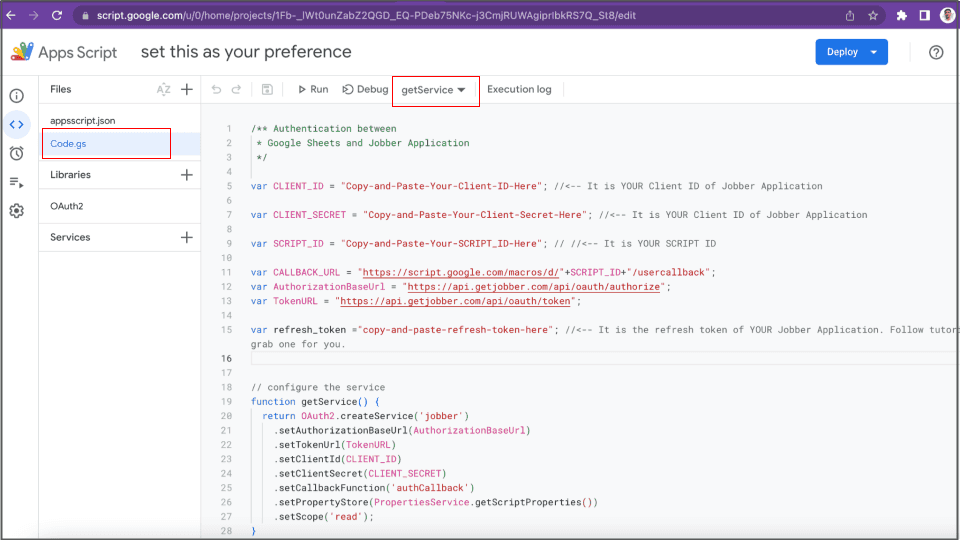
Now, copy and paste the code below, then to paste it into the Code.gs file.
* Google Sheets and Jobber Application*/var CLIENT_ID = "Copy-and-Paste-Your-Client-ID-Here"; //<-- It is YOUR Client ID of Jobber Applicationvar CLIENT_SECRET = "Copy-and-Paste-Your-Client-Secret-Here"; //<-- It is YOUR Client ID of Jobber Applicationvar SCRIPT_ID = "Copy-and-Paste-Your-SCRIPT_ID-Here"; // //<-- It is YOUR SCRIPT IDvar CALLBACK_URL = "https://script.google.com/macros/d/"+SCRIPT_ID+"/usercallback";var AuthorizationBaseUrl = "https://api.getjobber.com/api/oauth/authorize";var TokenURL = "https://api.getjobber.com/api/oauth/token";var refresh_token ="copy-and-paste-refresh-token-here"; //<-- It is the refresh token of YOUR Jobber Application. Follow tutorial to grab one for you.// configure the servicefunction getService() {return OAuth2.createService('jobber').setAuthorizationBaseUrl(AuthorizationBaseUrl).setTokenUrl(TokenURL).setClientId(CLIENT_ID).setClientSecret(CLIENT_SECRET).setCallbackFunction('authCallback').setPropertyStore(PropertiesService.getScriptProperties()).setScope('read');}// Logs the redict URI to register// can also get this from File > Project Propertiesfunction logRedirectUri() {var service = getService();Logger.log(service.getRedirectUri()); ////Logger.log(OAuth2.getRedirectUri());}// handle the callbackfunction authCallback(request) {var service = getService();var isAuthorized = service.handleCallback(request);Logger.log("request: " + request ); // current output: request: [object Object]Logger.log("isAuthorized: "+ isAuthorized); // current output: trueLogger.log("getUserProperties" + PropertiesService.getUserProperties());if (isAuthorized) {return HtmlService.createHtmlOutput('Success! You can close this tab.');} else {return HtmlService.createHtmlOutput('Denied. You can close this tab');}}// Function to get the OAuth2 access token.function getAccessToken() {var service = getService();if (service.hasAccess()) {return service.getAccessToken();} else {var authorizationUrl = service.getAuthorizationUrl();var template = HtmlService.createTemplate('<a href="<?= authorizationUrl ?>" target="_blank">Click to Authorize</a>.');template.authorizationUrl = authorizationUrl;var page = template.evaluate();SpreadsheetApp.getUi().showSidebar(page);Logger.log("authorizationUrl: " + authorizationUrl); //output:Logger.log("Token: " + service.getAccessToken());}Logger.log(service.getAccessToken());}/*** Reset the authorization state, so that it can be re-tested.*/function reset_access() {getService().reset();}/*** Refresh TOKEN*/function get_new_accessToken_from_refresh_token() {var url = "https://api.getjobber.com/api/oauth/token"; // url to postconst data = {'client_id': CLIENT_ID,'client_secret': CLIENT_SECRET,'refresh_token': refresh_token, // refresh_token//'redirect_uri': CALLBACK_URL,'grant_type': 'refresh_token'};const options = {'method': 'post','contentType': 'application/x-www-form-urlencoded','payload': data,"muteHttpExceptions": true};var apiresponse = UrlFetchApp.fetch(url, options);var head = apiresponse.getAllHeaders();var json_data = JSON.parse(apiresponse.getContentText());var new_token = json_data['access_token'];return new_token;}
When finishing, your Code.gs file will look like image below:
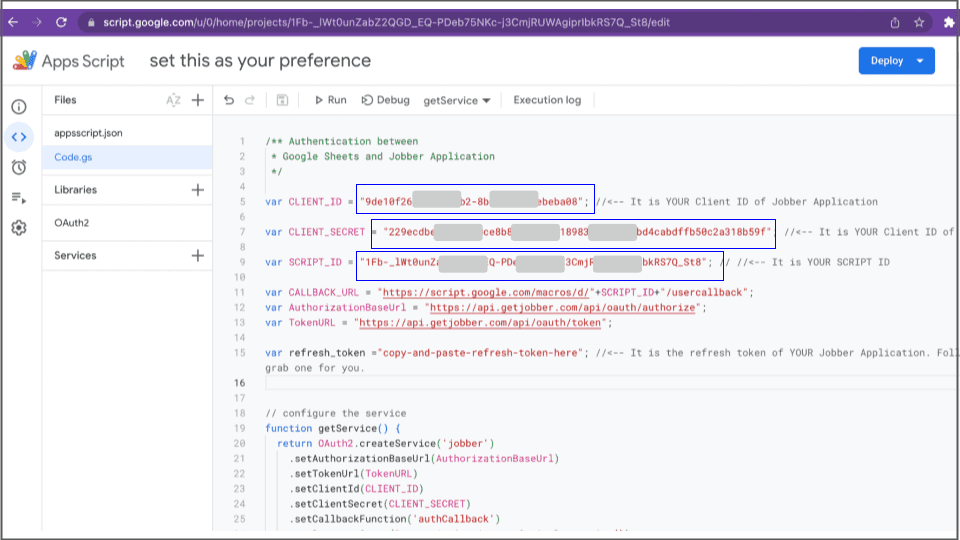
Input your client ID and client secret and SCRIPT ID into Code.gs file.
You need to input CLIENT_ID, CLIENT_SECRET and SCRIPT_ID into Code.gs file.
- The values of Client_ID and Client_Secret are mentioned at Step 1.3
- The script_id is mentioned at Step 2 (just above).
See the image below for reference. I put my client_Id and my client_secret and script_id.
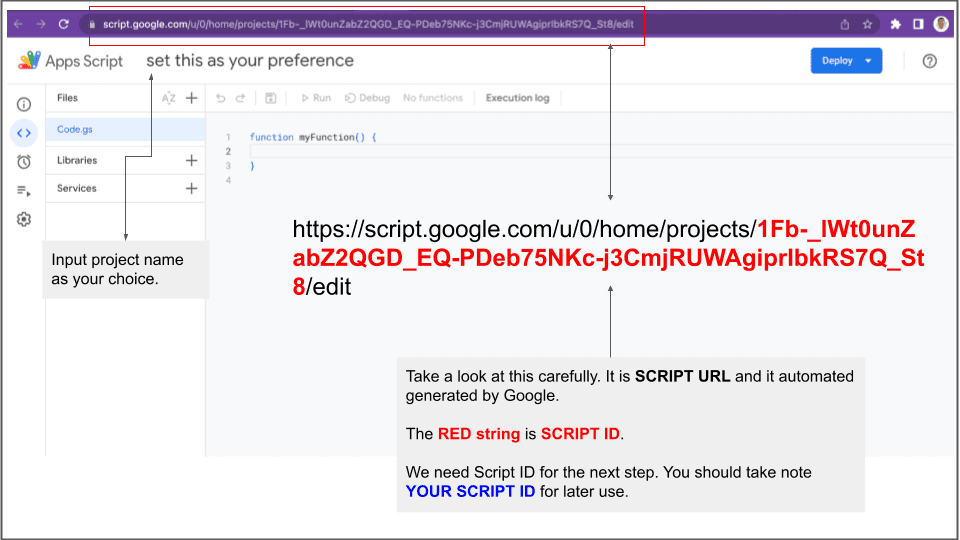
Build the callback URL
The callback URL for a web application which based on Google Apps script will have a structure like below:
https://script.google.com/macros/d/SCRIPT_ID/usercallback
So, for myself in this tutorial, the callback URL will be like this:
In above URL, my SCRIPT_ID is : 1Fb-_lWt0unZabZ2QGD_EQ-PDeb75NKc-j3CmjRUWAgiprIbkRS7Q_St8
It is your turn. Let you build your callback URL for your project as the guide above. When you finish this step, make a note about this callback URL.
You will need to copy and paste this callback URL into your Jobber Application. See step 1.2 for more details.
Publish your Apps script as Web Application
Now you need to publish your Apps script project as a Web Application.
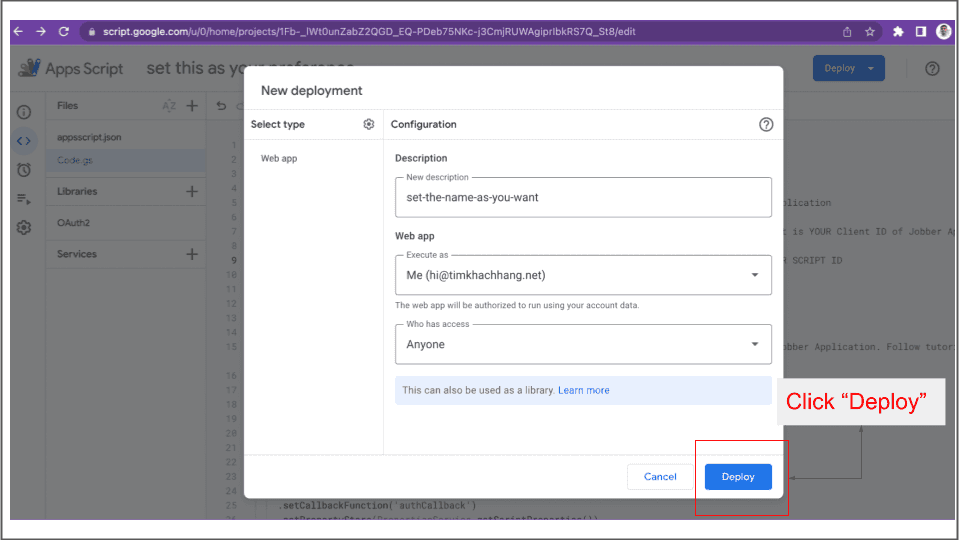
Click to the “Deploy” button (it is blue color) on the above right of your screen. Follow the image below for more detail.

After clicking on “new development”, you will be redirected to the screen as shown below. Click the “Deploy” button to go to the next step.
You then will see a screen as below.
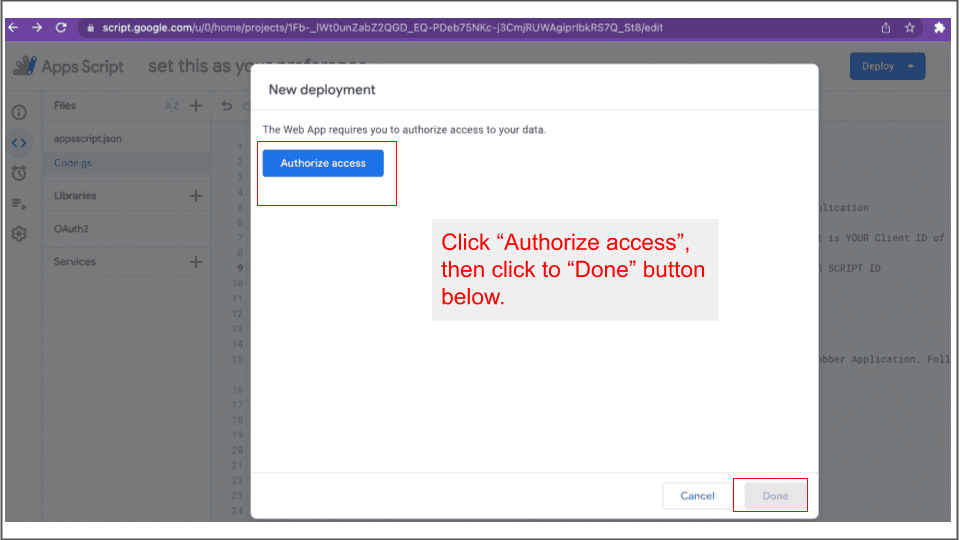
Click to “Authorize access”, then click on your gmail account when the pop-up is appearing. After that, click the “Allow” button.
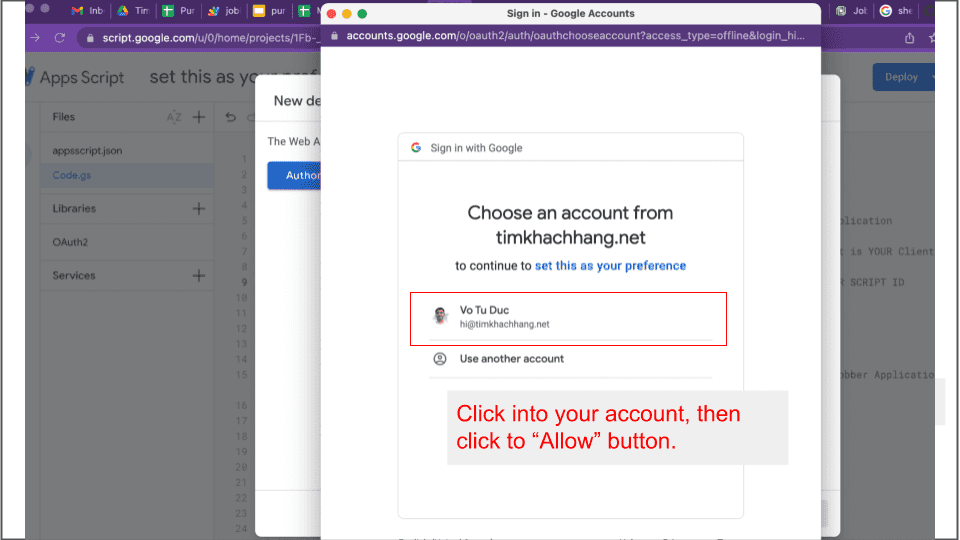
Just after clicking to “Allow” button, you will see a screen like below:
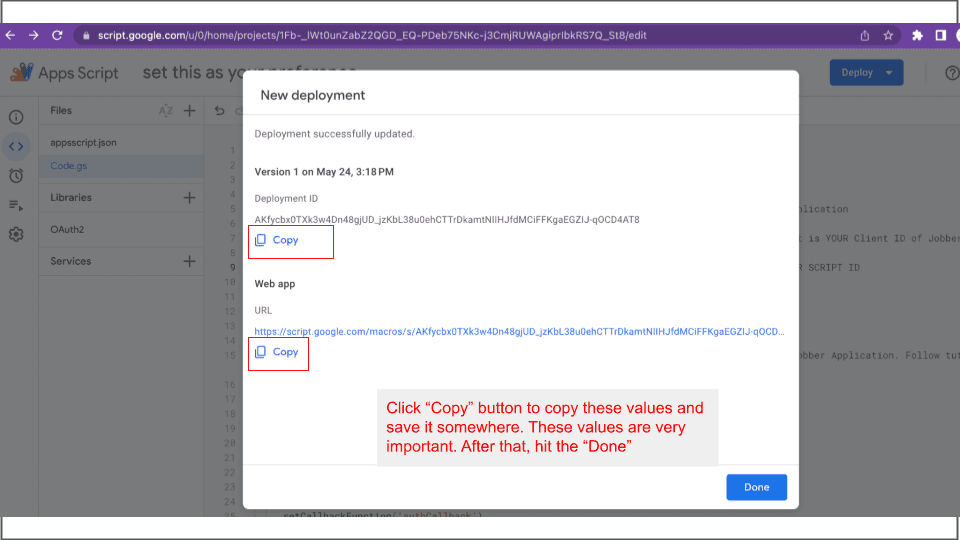
Copy and paste values of Development ID and Web App to somewhere as your preference. You will use it right after this step.
Your web app url will have a structure like this:
https://script.google.com/macros/s/XXXXXXXXXXXXXXXXXXXX/exec
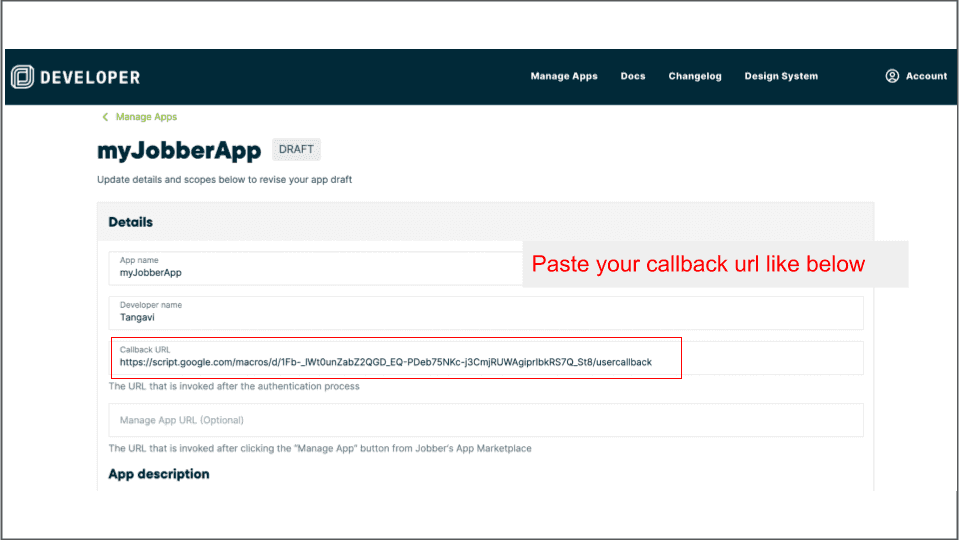
Input Callback url into your Jobber Application
Now turn back to your Jobber Developer account and open your application. Copy the callback URL mentioned above and paste it into the “callback URL” field.
See image below for reference.
Set up webhook
Now scroll down to below. You will see the Webhook section.
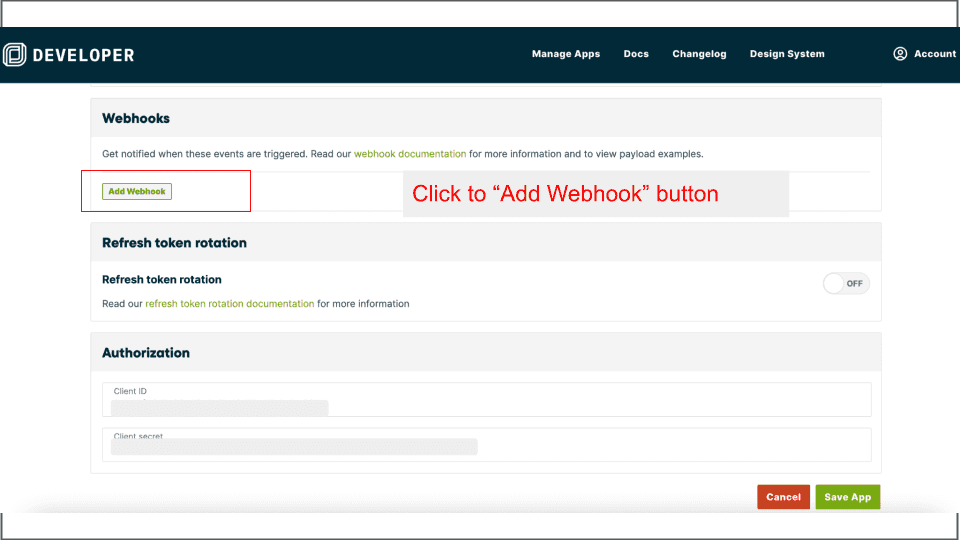
After clicking “Add Webhook”, you need to click to “Select topic”. Choose “JOB_CREATE” and paste your Web App url into “Webhook URL”.
After that, click “Add Webhook” for one more time, then click to “Select topic”. Choose “JOB_UPDATE” and paste your Web App url into “Webhook URL” again.
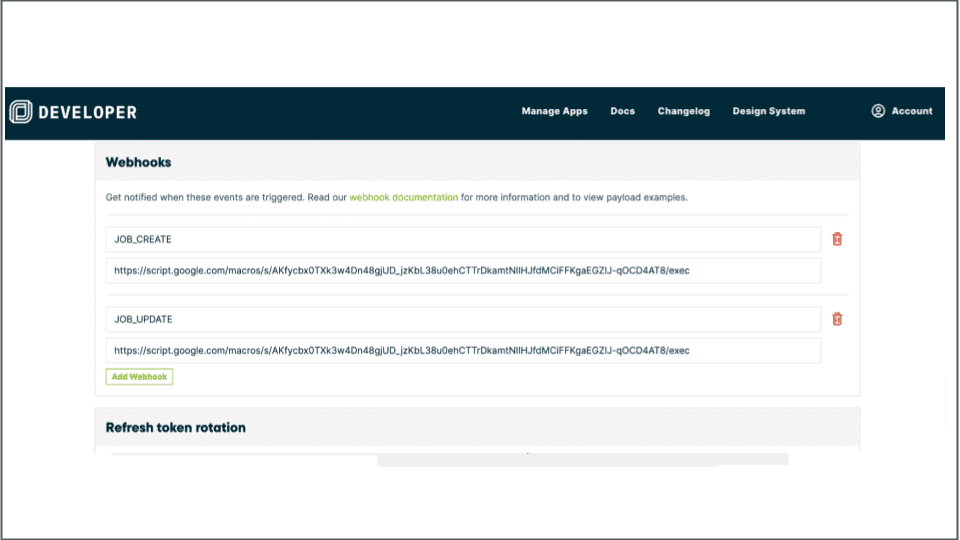
Scroll down and hit the “Save app” button. Yeah, you’re done. We are now ready to make authentication between Google Sheets and Jobber.
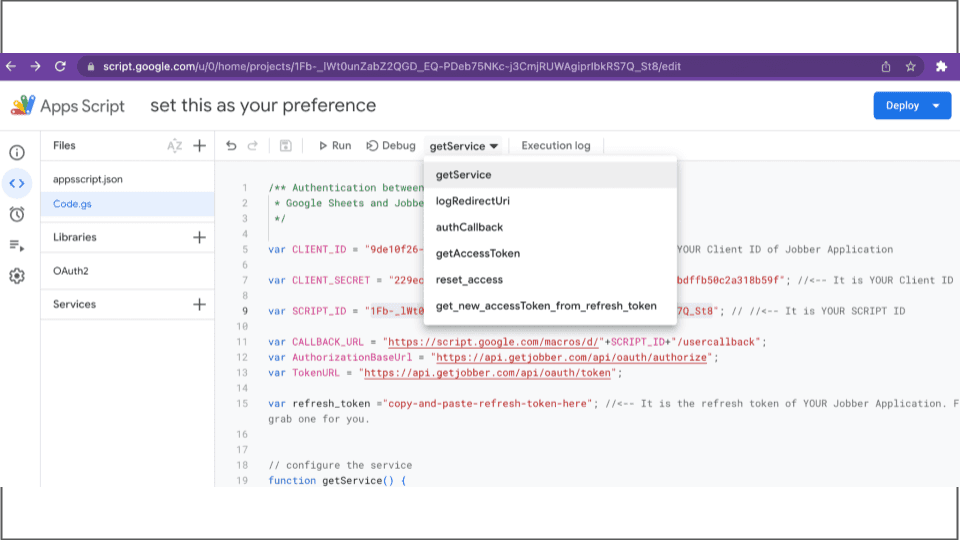
Now navigate to Apps script screen. Click to “getService” triangle button, you will see a list of function as image below:
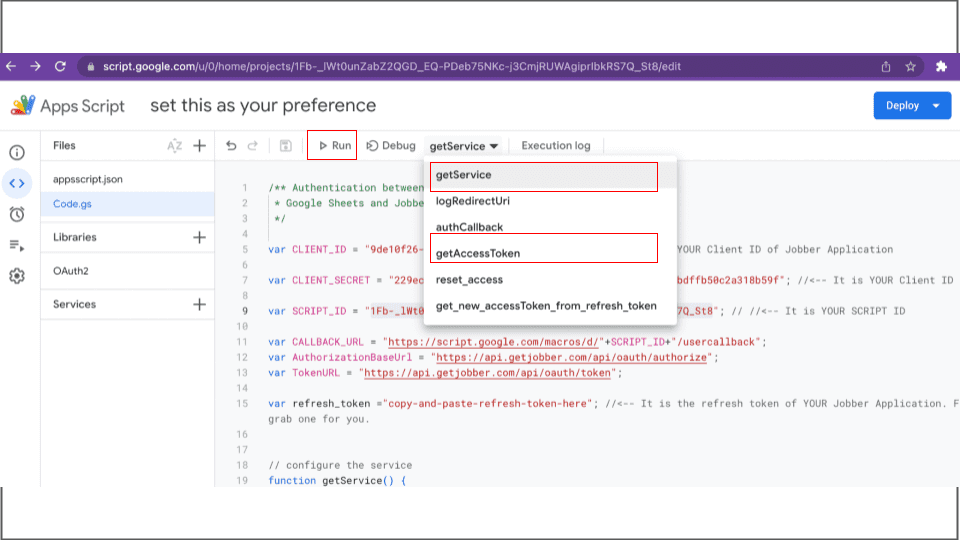
Now select the “getService” and click the “Run” button ( the triangle icon). After that, select “getAccessToken” and click the “Run” button again. You will see a message as image below:
We just try to send a request to the Jobber application to get the permission to access the App.
It’s very important to note that you need to login with both your Jobber account and your Jobber Developer account at this point.
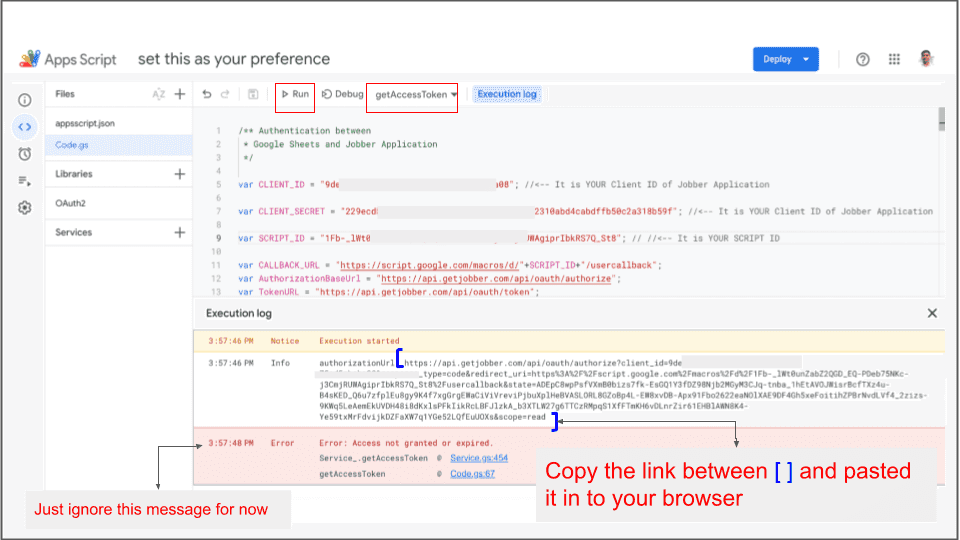
Now copy and paste the link between [ ] as shown on image above into your Chrome browser. Then hit the button to visit this link. You will redirect to the screen as below.
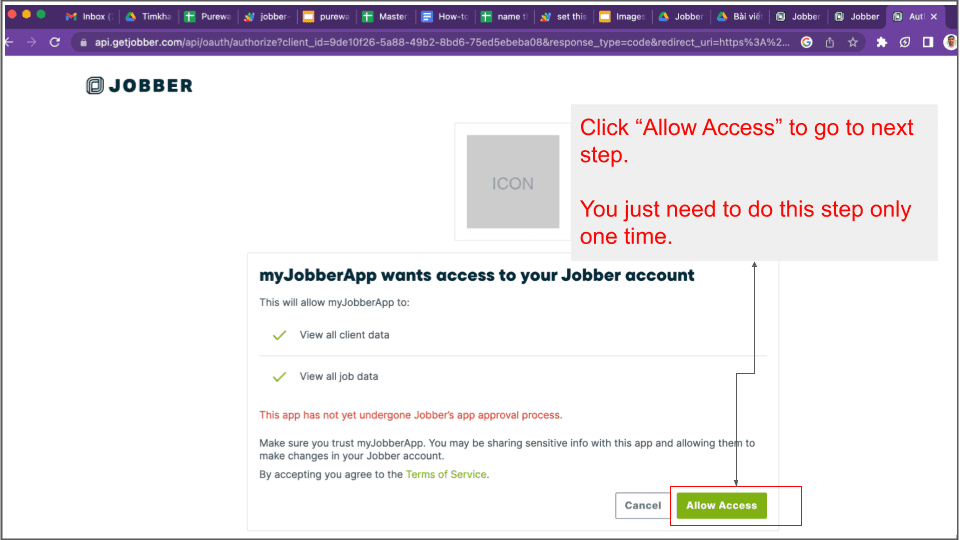
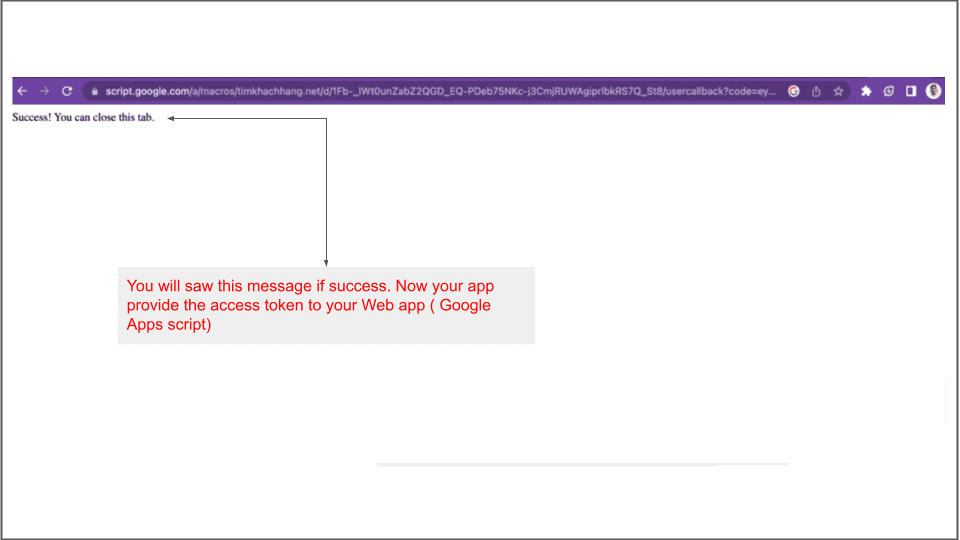
Click “Allow access” to go to the next step. If success you will see a screen like below:
Set up the access token for long-live
Now navigate to the Apps script screen. Then click to gear icon as shown below:
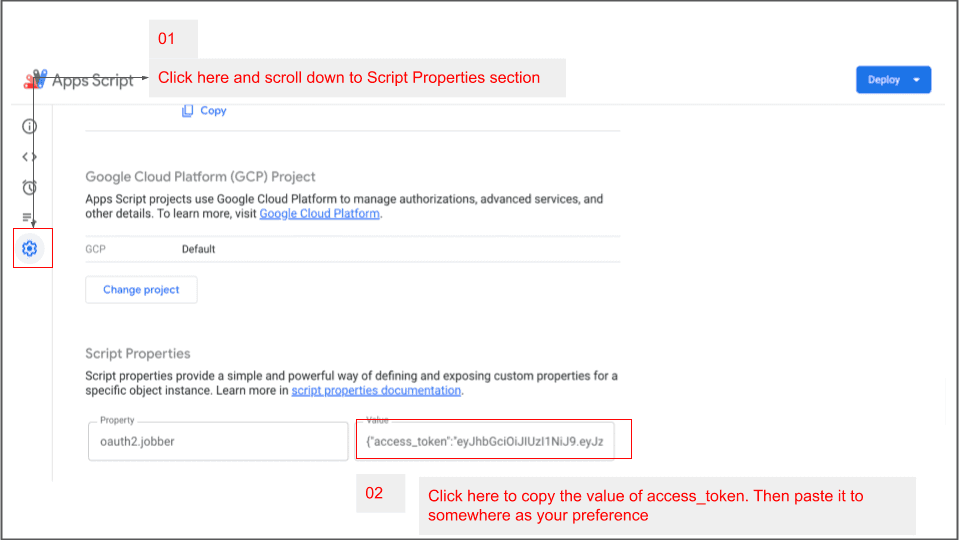
Then copy and paste the access_key value to somewhere as your preference.
The access_key will look like below:
{"access_token":"xxxxxxxx","refresh_token":"yyyyyyyyyy","granted_time":168491960}
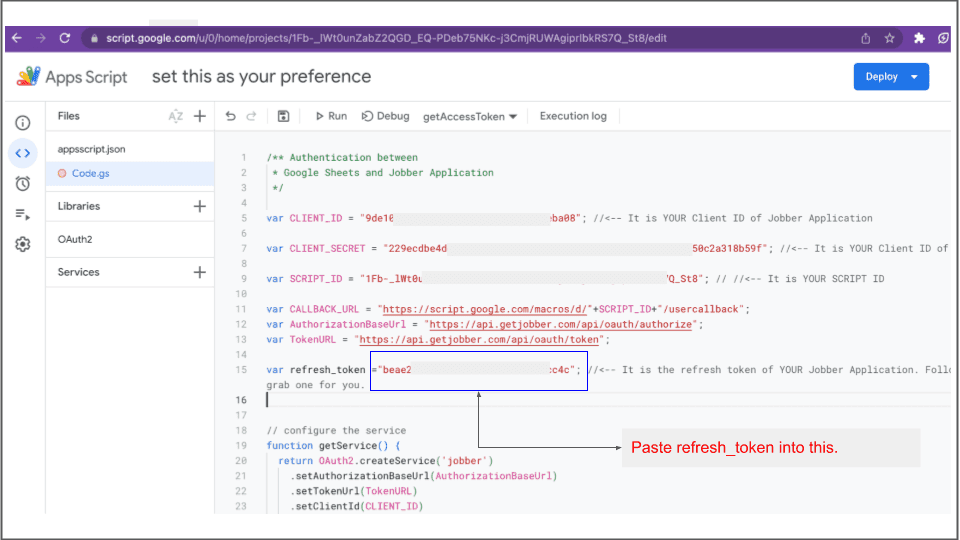
You now need to copy the refresh_token value and paste it into Code.gs file. See the image below for reference.
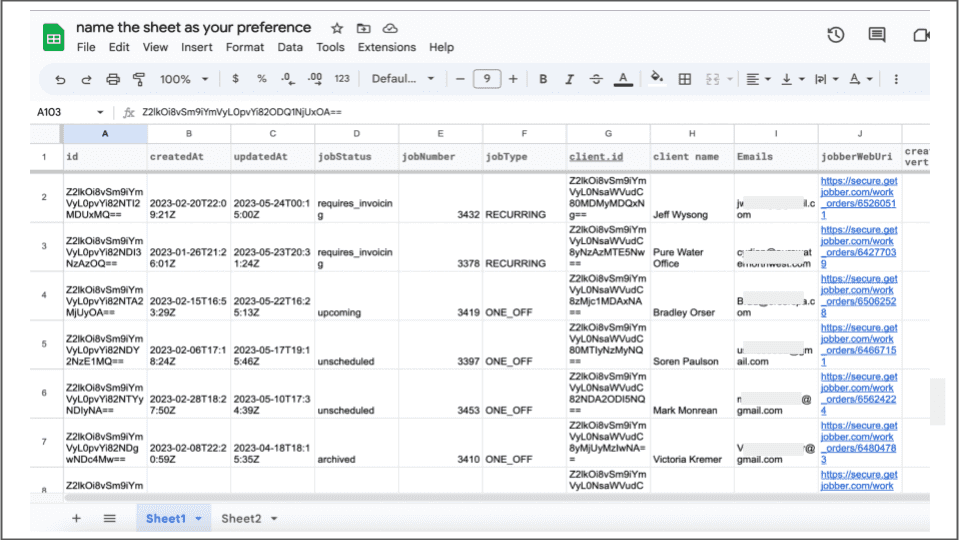
Step 3: Pull data from Jobber account into Google Sheets file
We now successfully connect between Jobber App and Google Web App. These last steps below help us to pull data from the Jobber account into Google Sheets.
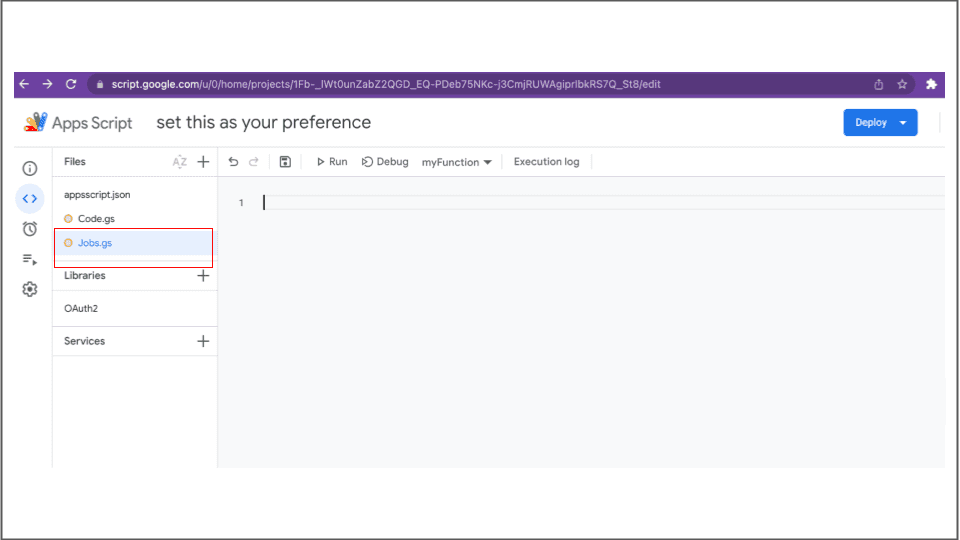
Create new Jobs.gs file
Navigate to the Apps script screen and click the ”+” button, then choose .gs file.
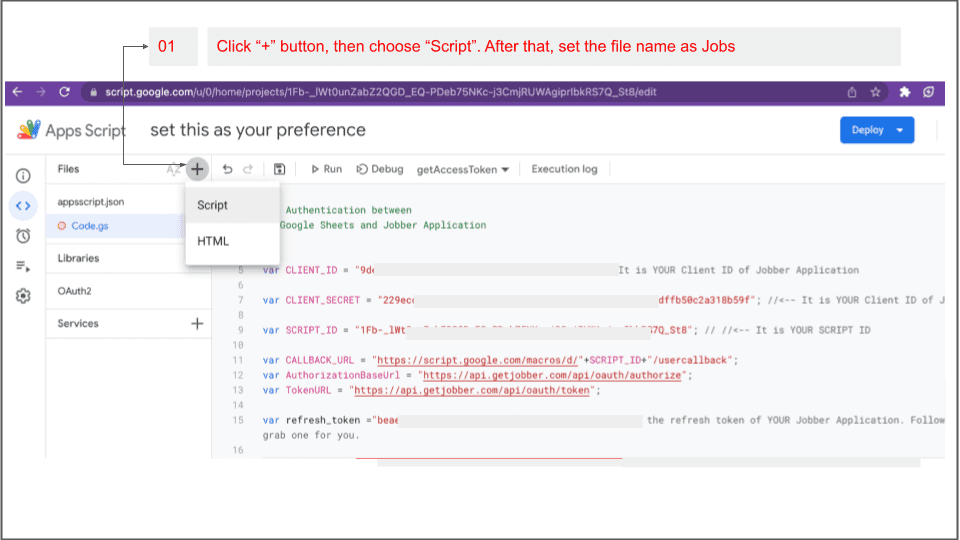
It looks like this:
Copy and paste the code into Jobs.gs file
Below is the code. Copy and paste it into Jobs.gs file.
*/var AFTER_DATE = "2018-01-01T00:00:00Z"; // Change Date as your demandvar BEFORE_DATE = "2018-05-31T00:00:00Z"; // Change Date as your demandvar URL = "https://api.getjobber.com/api/graphql"; //var API_VERSION = "2023-03-29";//var query_p1_jobs_create = `query jobs_CreatedAt {jobs(filter: {createdAt: {before: "`var query_p2_jobs_create = BEFORE_DATE; // 2022-12-31T00:00:00Z"var query_p3_jobs_create = '",after:"';var query_p4_jobs_create =AFTER_DATE; // after: "2022-12-01T23:00:00Z"var query_p5_jobs_create =`"}}){nodes{id,client{id,defaultEmails,name},jobberWebUri,jobStatus,jobType,jobNumber,startAt,endAt,createdAt,updatedAt}}}`;function JOBS(){var service = getService();var access_Token = get_new_accessToken_from_refresh_token(); //if (service.hasAccess()) {// build query:var query = query_p1_jobs_create+query_p2_jobs_create+query_p3_jobs_create+query_p4_jobs_create+query_p5_jobs_create;//Logger.log(query);const url = URL;const bridge = "?query=";const final_url_c_update = encodeURI(url+bridge+query); // Bắt buộc phải Encode URI.const options_c_update = {"method": "POST","muteHttpExceptions": true,"headers": {"Content-Type": "application/json","Authorization": "Bearer " + access_Token,"X-JOBBER-GRAPHQL-VERSION": API_VERSION}};var apiresponse_c_update = UrlFetchApp.fetch(final_url_c_update,options_c_update);var json_data = JSON.parse(apiresponse_c_update.getContentText());var json_data_l1 = json_data["data"];var json_data_clients = json_data_l1["jobs"]; //jobsvar json_data_nodes = json_data_clients["nodes"];//nodesLogger.log(json_data_l1);/** NHỮNG DATA NÀO LẤY ĐƯỢC Ở LEVEL0 => XỬ LÝ THEO CÁCH NÀY.**/var arrayProperties = [];json_data_nodes.forEach(function(e) {arrayProperties.push([e.id,e.createdAt,e.updatedAt,e.jobStatus,e.jobNumber,e.jobType,e.client.id,e.client.name,e.client.defaultEmails[0],e.jobberWebUri,]);});Logger.log(arrayProperties);var sheet = SpreadsheetApp.getActiveSpreadsheet().getSheetByName("Sheet1");var last_row = sheet.getLastRow();var setData = sheet.getRange(last_row+1,1, arrayProperties.length, 10).setValues(arrayProperties);}}
Select date range and input into Jobs.gs file
You can change the date range of data as demand. In my example, I choose the date range as:
var AFTER_DATE = "2023-01-01T00:00:00Z"; // from 01-01-2023var BEFORE_DATE = "2023-05-01T00:00:00Z"; // to from 05-01-2023
When finish this step, your Jobs.gs file will look like this image:

Run Jobs function and finish the task
We’re DONE. now just hit the “Run” button to run JOBS function. The Jobs data will be automated pull from your Jobber account into your Google Sheets.
See the image below for reference.
Conclusion
That’s all for today. If you have any questions, please feel free to reach me via email. I’m working as a freelancer and I’m providing the integration service at a good rate. Let’s connect to open the opportunity between us. Have a great day.


Table Of Contents
Related Posts
Quick Links
Legal Stuff