


Change Google Docs Font Without Losing Formatting
February 20, 2025
4 min

This comprehensive guide walks you through connecting AppSheet to Google Cloud SQL, step-by-step. Unlock the power of a scalable and secure database to build powerful, data-driven mobile applications. Learn everything you need to know, from setting up Google Cloud SQL server, setting up the MySQL database as the datasource for AppSheet Apps, the connection to leveraging Cloud SQL for seamless data management in your AppSheet projects. If you are an AppSheet app creator or developer, this tutorial will likely be the best practice for you during the process of working with Google Cloud SQL.
Google Sheets and Google AppSheet database are the best choice for your AppSheet application in terms of fast development of the application. In case you want to scale and to unlock higher performance for your AppSheet app, you will need to use a professional cloud database. In this case, Google Cloud SQL and MySQL database is the best choice for you.
Using Google Cloud SQL as a data source also makes your app more secure, reliable, flexible for your own AppSheet app.
To follow the guide in this post, make sure you have things as below:
- A Google Cloud project account with billing has been enabled. You are free to try to use Google Cloud as Google always offers $200 as the credit for any new Gmail account.
- A Google AppSheet account with a Core plan or higher plan. If you are working within a corporate environment, you may need to ask your IT administrator to enable the permission for your AppSheet account to have the ability to connect with external cloud servers.
- A basic understanding of SQL and Google Cloud.
No worries about SQL statements and other things related to MySQL. First thing first is you can make a connection between Google SQL to your AppSheet account. You then can learn about MySQL in advance later.
- AppSheet Knowledge. Assume that you are not a beginner in AppSheet. My personal experience is if you work deeply with AppSheet for around 3 months, then it will be easy to follow this post.
In this section, we will walk through the process of creating a new Google Cloud project, then creating and setting up a Google Cloud SQL.
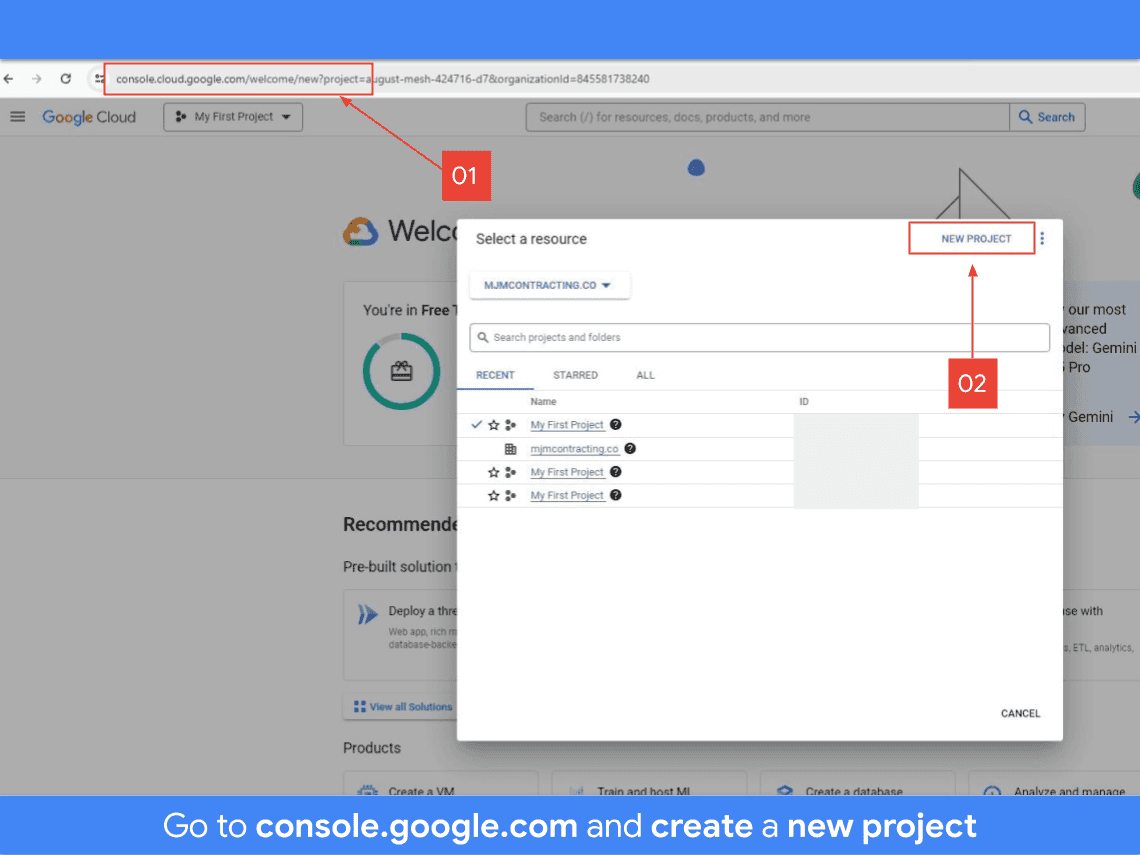
First, go to https://console.cloud.google.com/ and login to Google cloud by using your preference account such as your personal Gmail account or your Google Workspace account. Then click to New Project as image below:
Then input the new project information as your preference. Below is my newly created Google Cloud project. You should create a new Google Sheets or Google Docs to take note about the project information and other information in the incoming steps because we will reuse these information during the setting process.
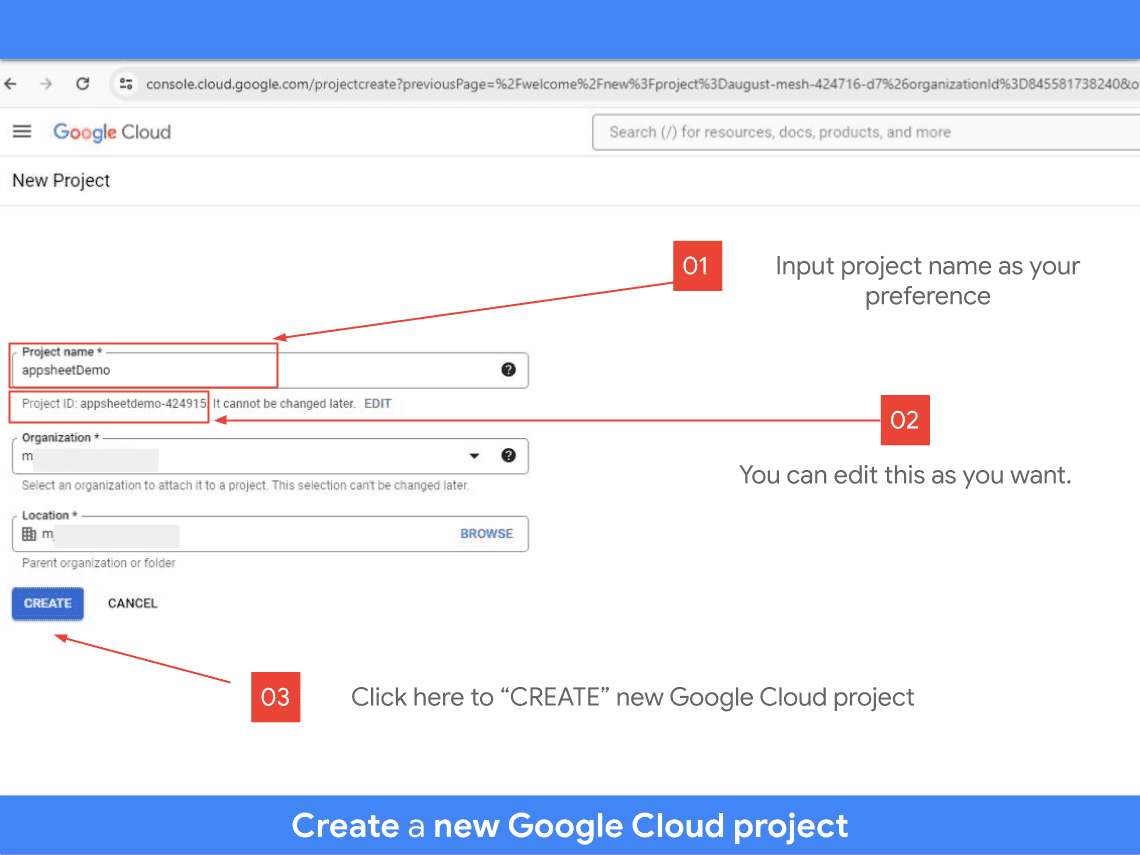
Here is the table of project information I’ve created. You should take note of this information about your newly created project.
| # | Information | Value | Note |
| 1 | Project Name | appsheetDemo | |
| 2 | Project ID | appsheetdemo-424915 |
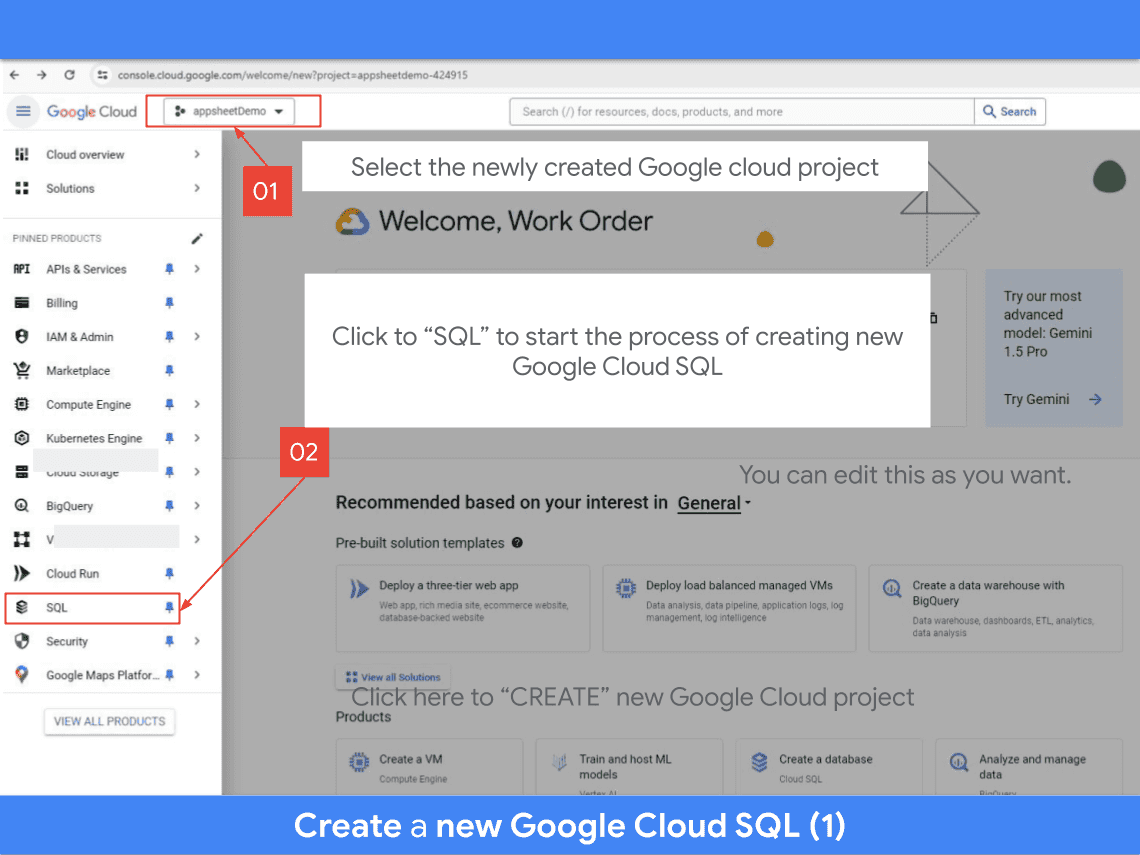
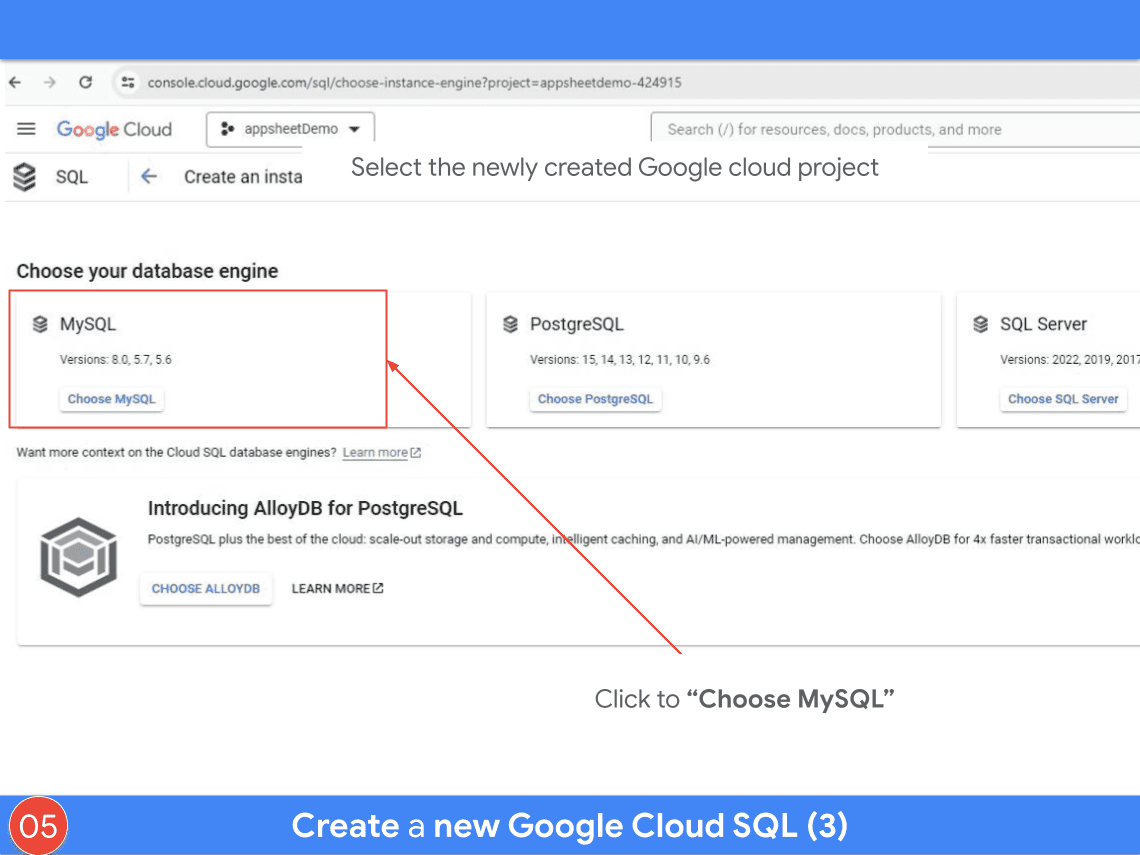
Now follow the images below to create a new Google Cloud SQL.
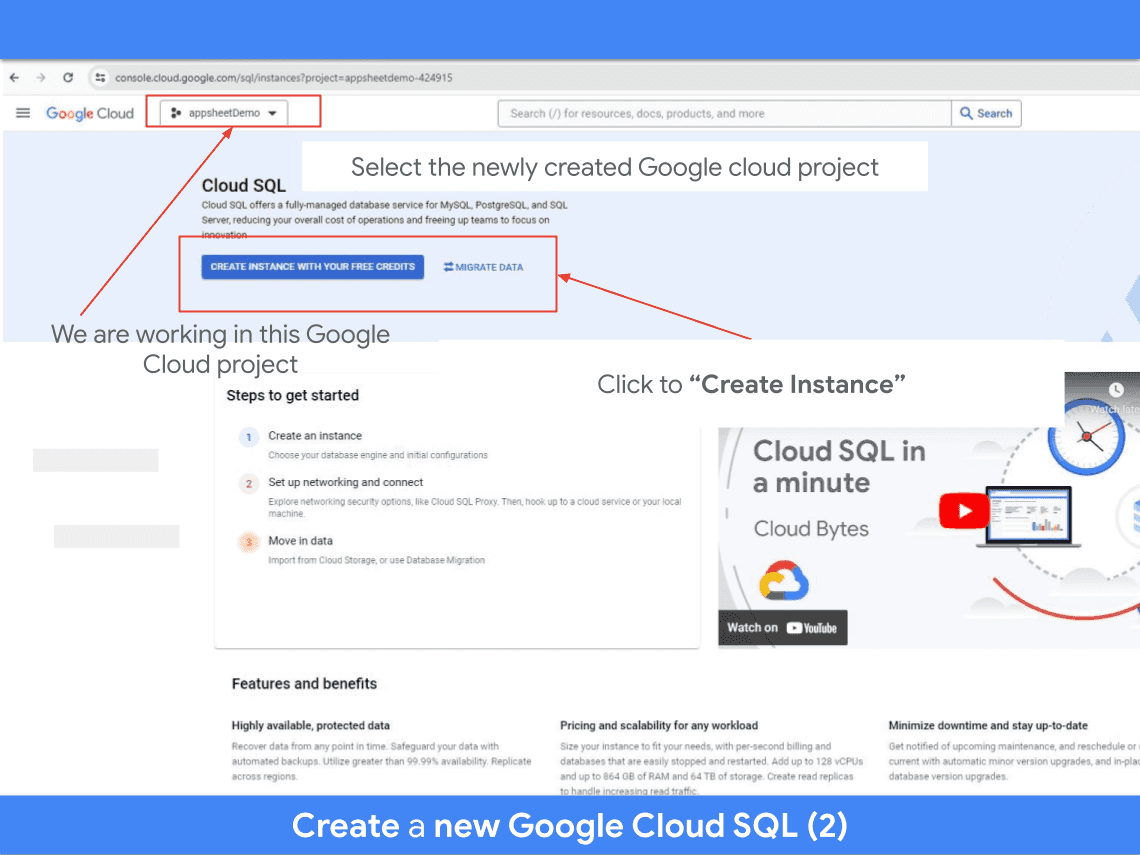
After that, click to “Create Instance” to start the process of creating a new Google Cloud SQL server.
In the next screen, choose “MySQL” as image below:
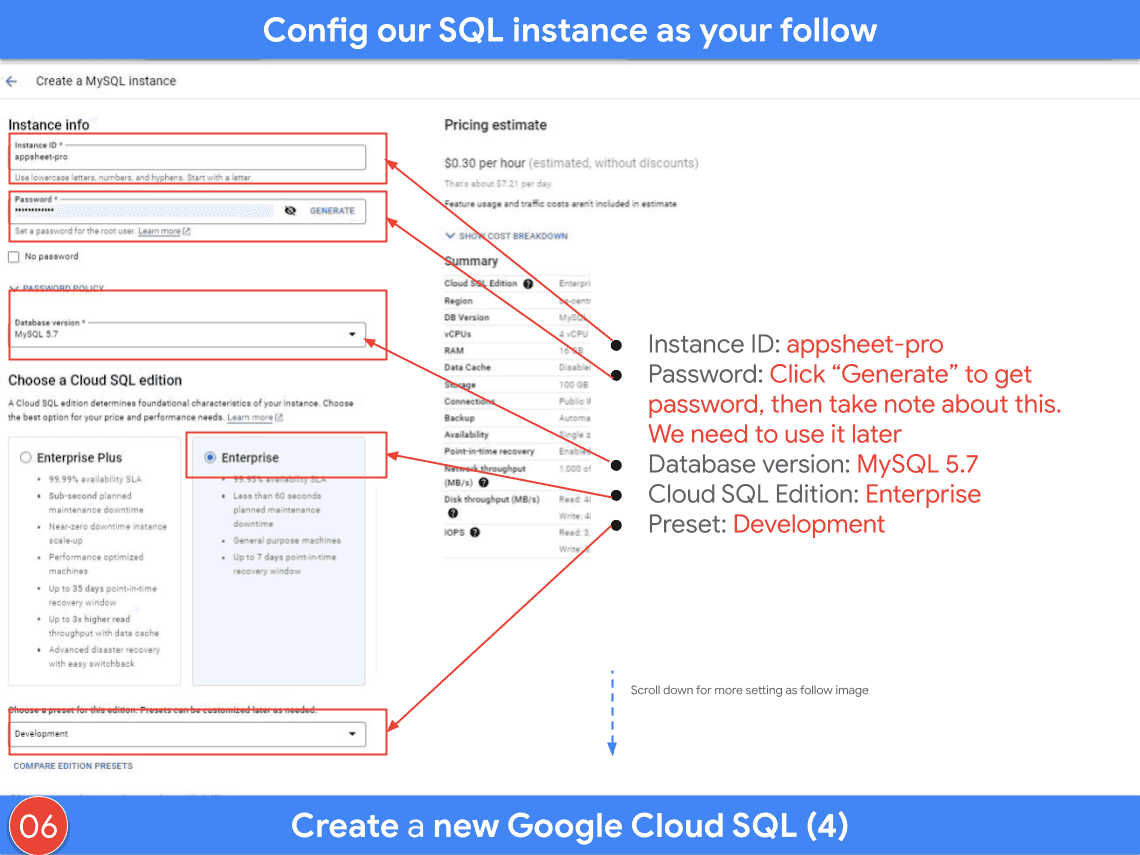
Click the “ENABLE API” button If you see a message that is “In order to create an instance, you have to enable the Compute Engine API first”. This is just a basic setting that should be enabled for things working as expected. A moment later, you will start to input your configuration/preference about our Google SQL instance.
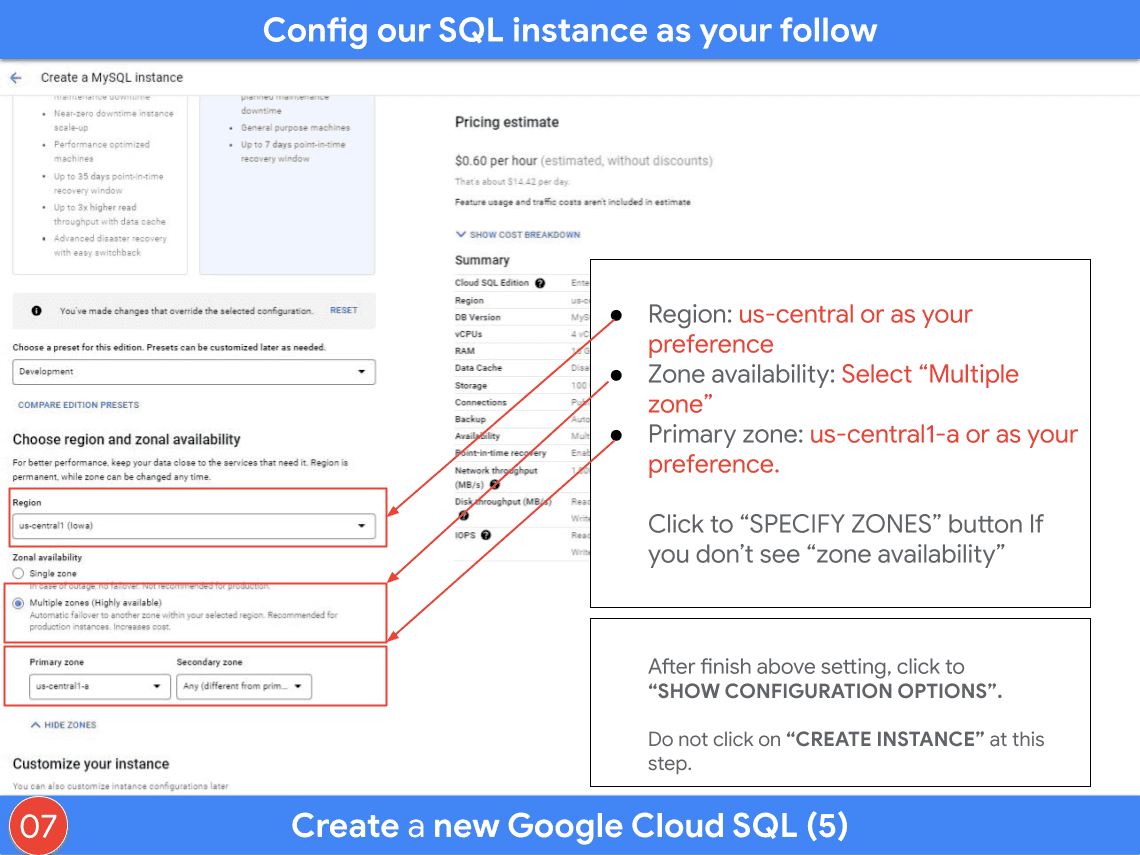
Images below show what the configuration is in my case. You should follow this setting and change it later when you have already understood how things work properly.
From current page, scroll down for more setting as image below:
We are now heading to the “Connections” setting. We will define which networks are authorized to connect to our Cloud SQL Instance. This part is a very important task. The output of this setting is that we will authorize the list of AppSheet server IP to be able to access our SQL instance.
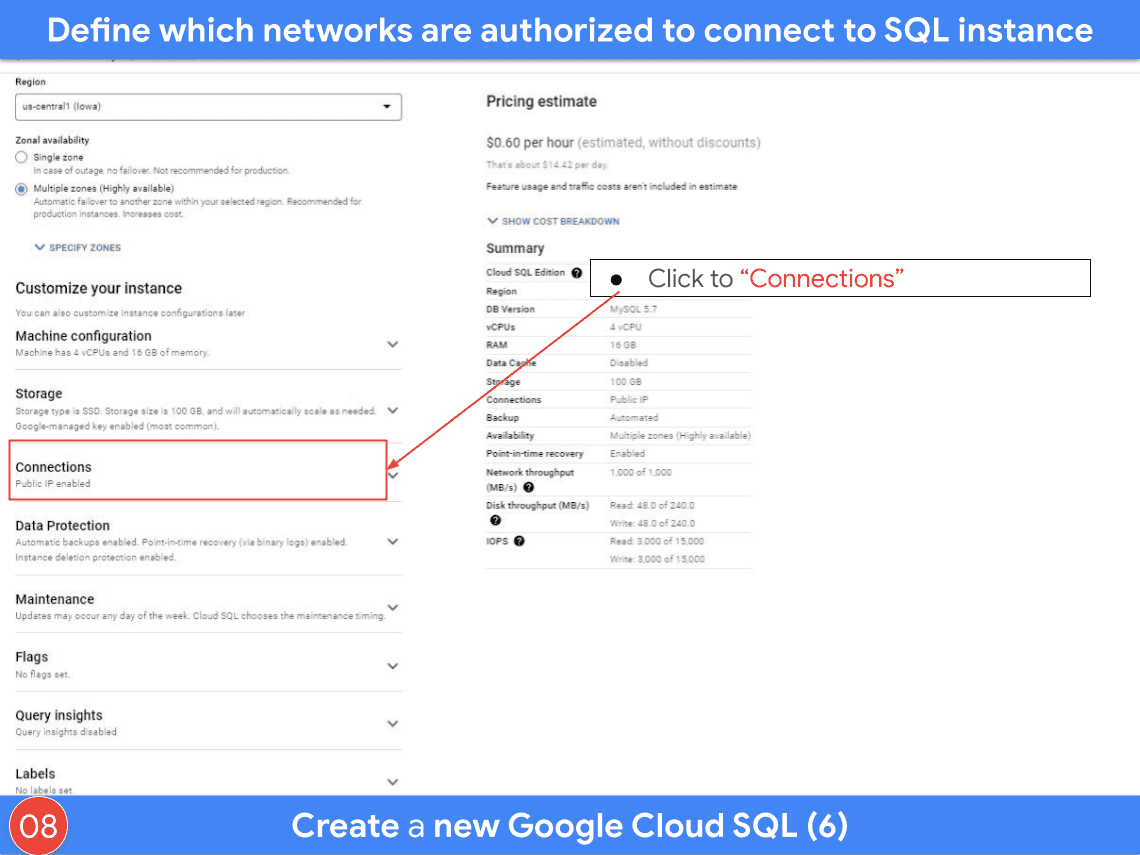
Do not click “Private IP”. Leave the default setting as “selected Public IP”. Then click to “ADD A NETWORK”. After that, input the information as follows:
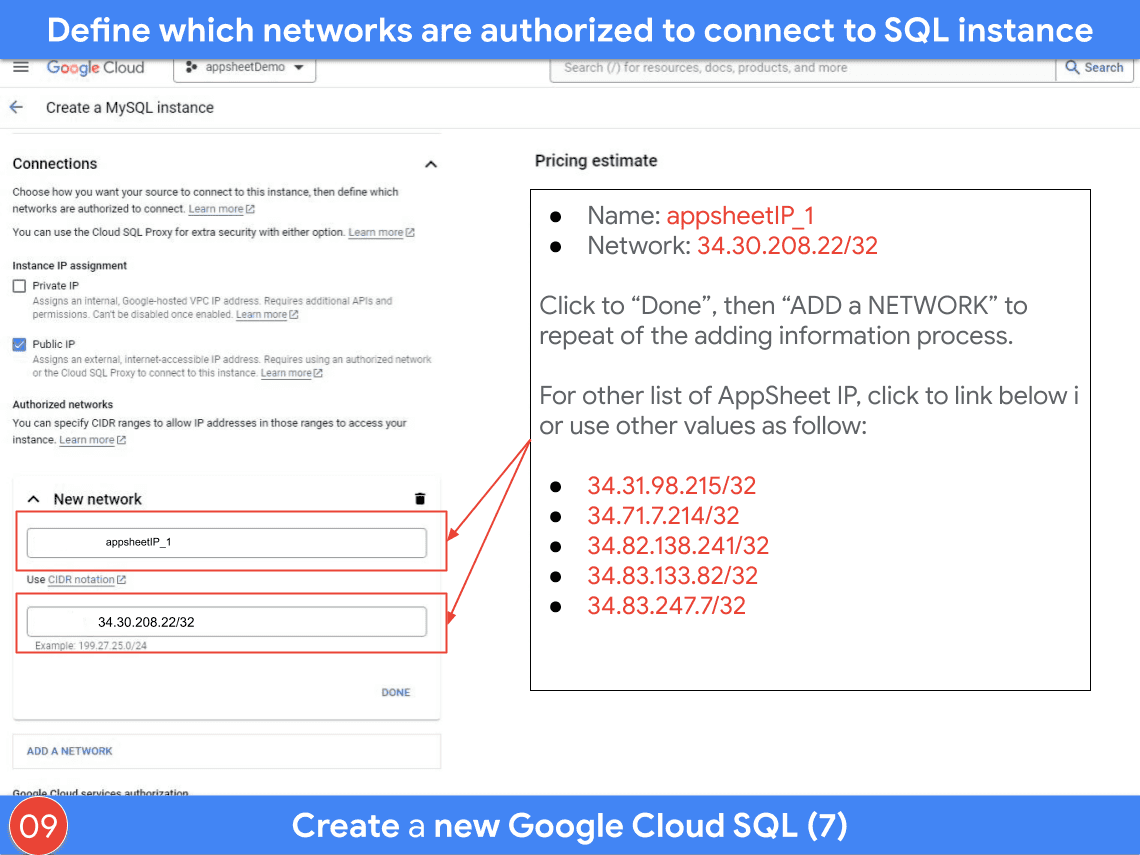
In case you want to set the difference with me, here is the link to the full list of AppSheet IP addresses.
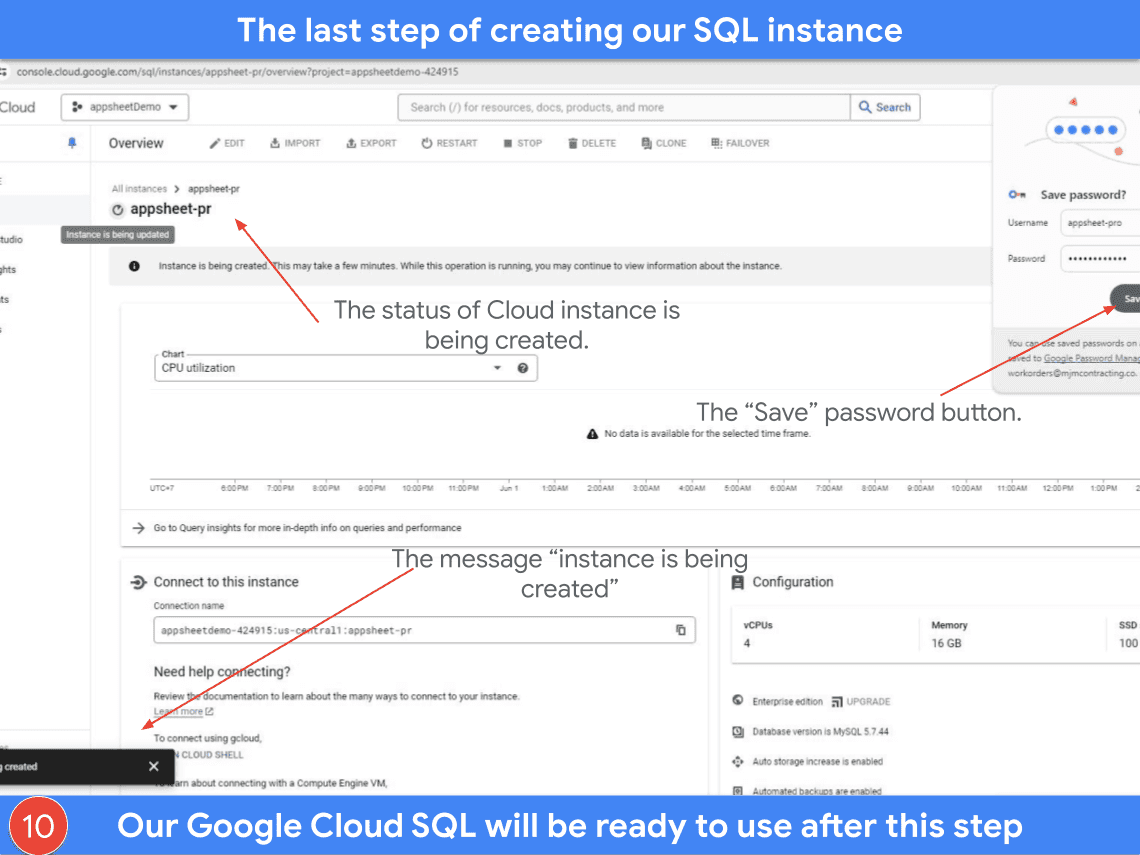
It’s all set! Now click to “CREATE INSTANCE” at the bottom of the current screen to finish the process of creating a new Google Cloud SQL instance. You will be notified with a message directly on the current screen that is “Instance is being created”. Take a coffee and wait a moment during the process of automated creating the instance by Google cloud. It is recommended that you should click the “Save” button if you are using Chrome browser with Google password manager. See below image for more detail.
When finishing successfully, you will see the screen as below:
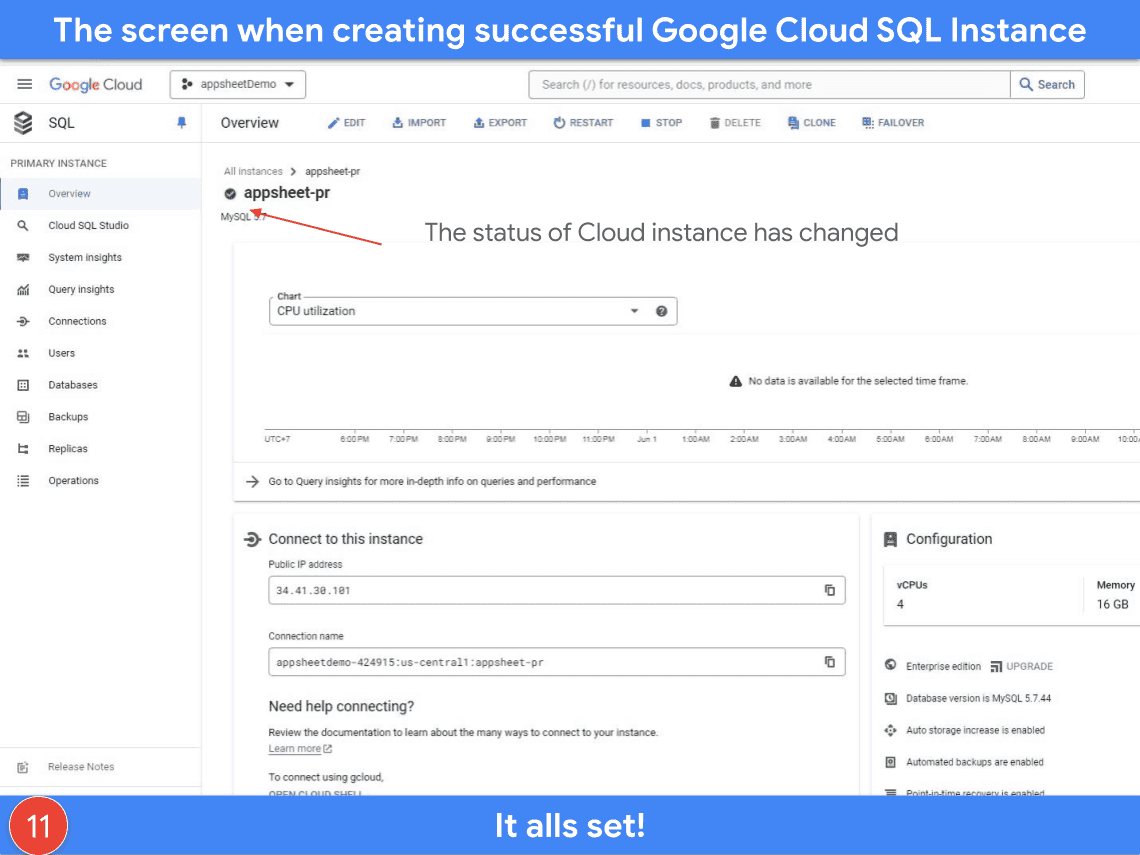
To wrap up in this section, what you’ve done are:
- Successfully created a new Google Cloud SQL instance
- You now have and it should noted information below for using in the next steps:

| # | Information | Value | Note |
| 1 | Project Name | appsheetDemo | |
| 2 | Project ID | appsheetdemo-424915 | |
| 3 | Instance ID | appsheet-pr | |
| 4 | Instance pass | your_instance_password | This is the password that was just mentioned above. We will need to use this password later. |
| 5 | 34.41.30.101 | We need to add this info to our AppSheet account later. |
Below is the basic explanation about the relationship between your Google Account, Google Cloud Project and Google Cloud SQL. It may help if it is the first time ever you are interactive with Google Cloud Platform.
- Google Account: This is your key that unlocks all the different workspaces and tools you have access to (like Gmail and YouTube).
- Google Cloud Project: This is your designated workspace for building a specific project, like your clubhouse. It has its own set of tools for construction.
- Google Cloud SQL: This is a special tool chest within your project that stores all the important information (data) you need to build your clubhouse, like blueprints and materials.
We’re now starting up to set up the MySQL database. Our AppSheet app will use the database that mentioned in this step as a datasource.
First, we will need to create a new User in our Google SQL instance.
From the last screen, navigate to the “Users” tab on the left, then click to “ADD USER ACCOUNT”, from there you will be able to add Username and Password. Look at the image below in detail.
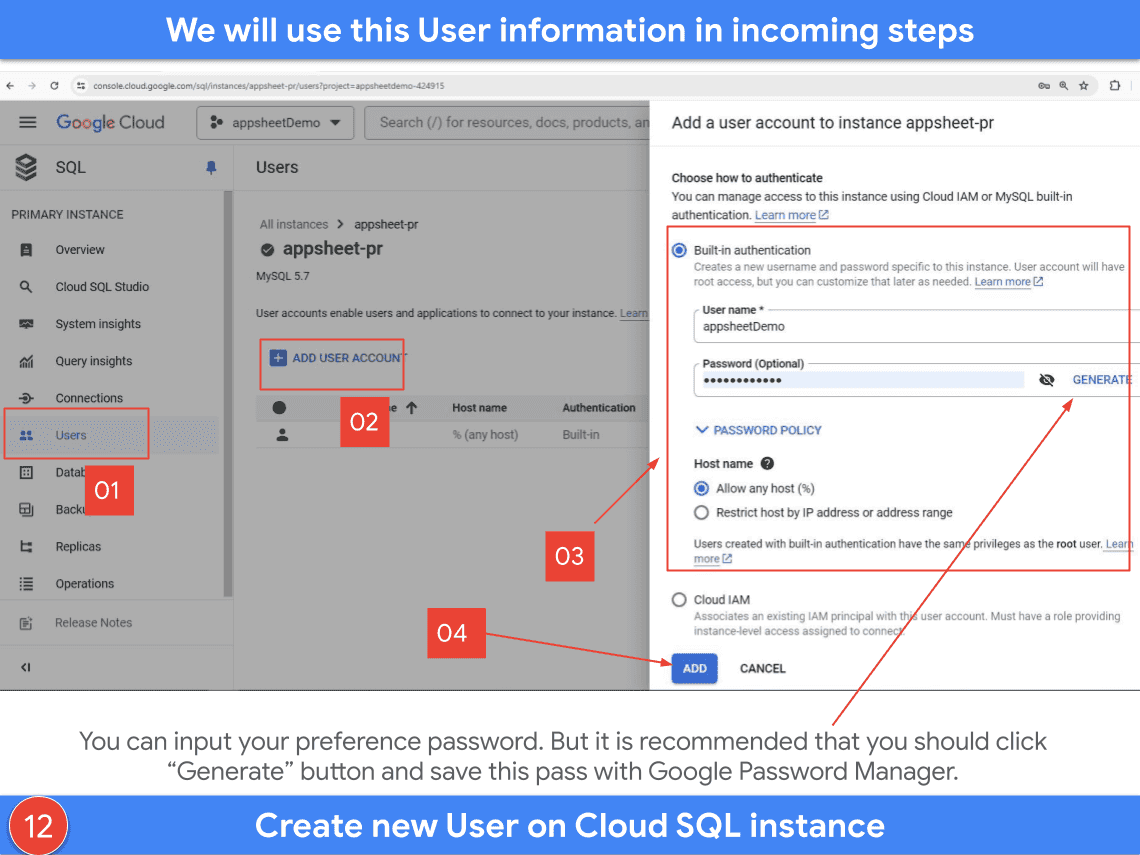
Take notes about this user information. It is very important. We will use this information when adding information to the AppSheet account and during the process of working with Cloud SQL studio as follows.
In my case, the user name is appsheetDemo and the password is generated automatically.
From the last screen, navigate to the “Database” tab on the left, then click to “CREATE DATABASE”, from there you will be able to add Database Name, and Character set. Look at the image below in detail.
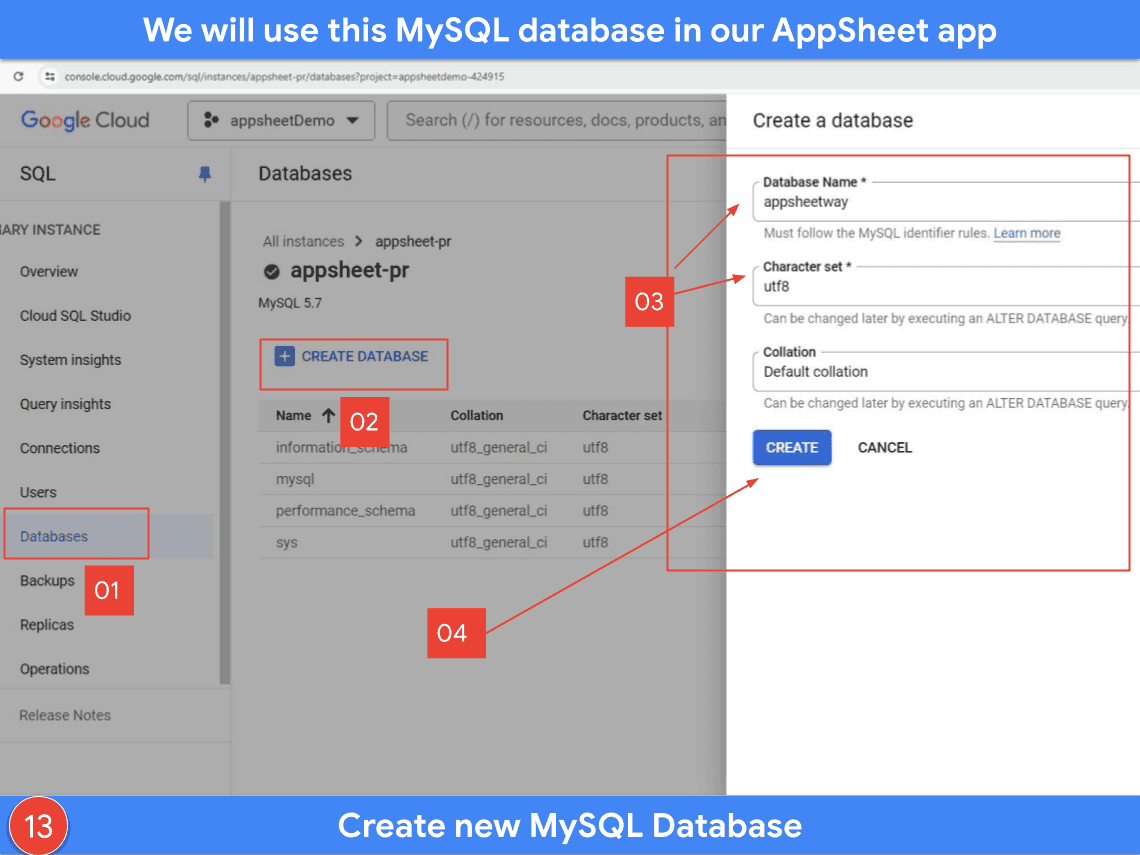
In my case, the Database Name is appsheetway and the Character set is utf8 as default setting. After that we will need to create some tables in our database.
To do that, navigate to the “Cloud SQL Studio” tab that is located above the “Databases” tab, then input the Database, User and Password, then click to “AUTHENTICATE”. The detail screen is** **as below:
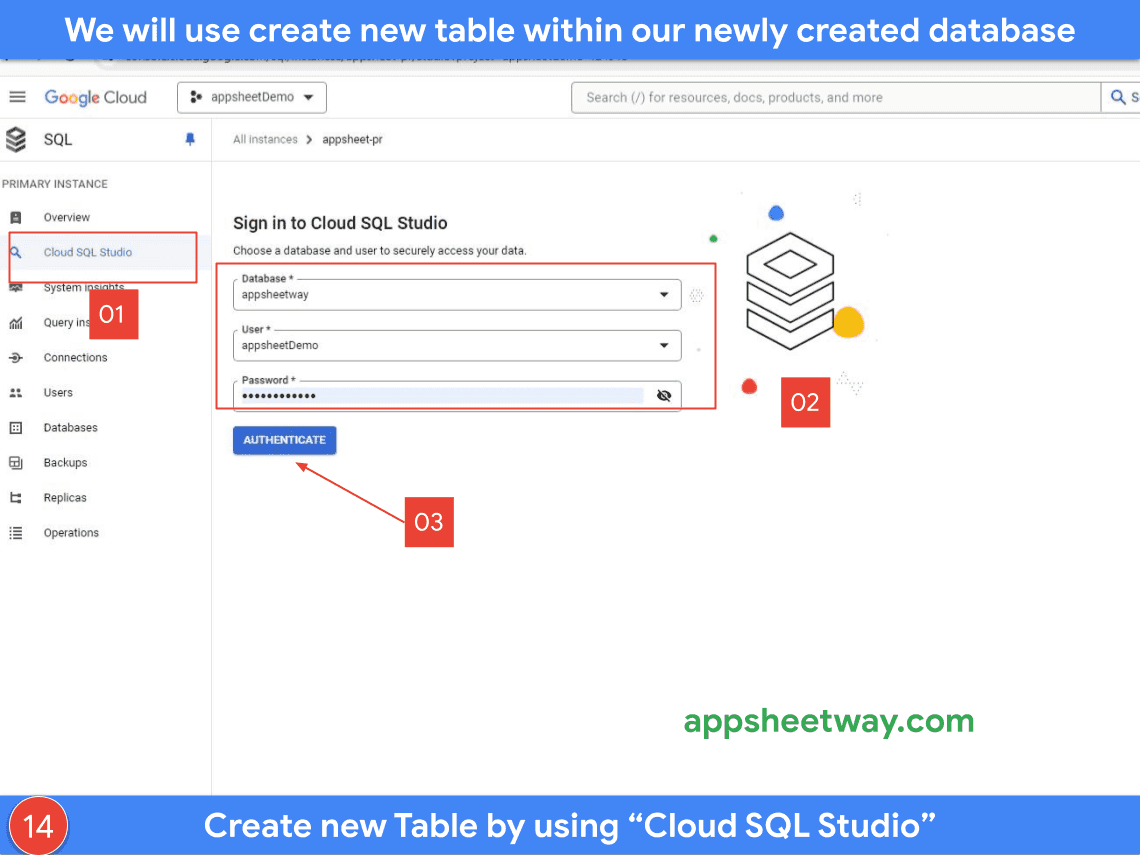
In my case:
- The database: appsheetway
- The User: appsheetDemo
- The password: This is the password of the appsheetDemo User which was created during the process of creating a new User.
When authenticated successfully, you will see the screen as following:

Now click to the “Editor 1” tab to start the process of creating a new table within our database.
In my scenarios, I will create a new table name as Products. The structure of the Products** **table will look as follows.
For the 2nd row in the table below, it is the data type on the AppSheet app which you may have familiar with during your AppSheet app development.
| id | name | description | price | category |
| Unique ID | Text | Long text | Decimal | Enum |
We will now create a SQL query to create the Products table that has the above columns.
Here is how the SQL query looks like:
SQL queryCREATE TABLE Products (id INT,name VARCHAR(255),description LONGTEXT,price DECIMAL(4,2),category ENUM ('Electronics','Furniture','Clothing'),)
The provided SQL code creates a table named Products in a database. Let’s break down what each line does:
- CREATE TABLE Products ( : This line initiates the creation of a new table named Products.
- id INT, : This line defines the first column named id. The data type for this column is INT, which means it will store integer values (whole numbers) for product identification. The comma indicates there are more columns to define.
- name VARCHAR(255), : This line defines a column named name. The data type is VARCHAR(255), which means it can store variable-length character strings (text) with a maximum of 255 characters. This will likely hold the product name.
- description LONGTEXT, : This line defines a column named description. The data type is LONGTEXT, which is suitable for storing large amounts of text information, like detailed product descriptions.
- price DECIMAL(4,2), : This line defines a column named price. The data type is DECIMAL(4,2). This data type is ideal for storing monetary values because it allows for both whole numbers (up to 4 digits before the decimal point) and decimal places (up to 2 digits after the decimal point).
- category ENUM (‘Electronics’,‘Furniture’,‘Clothing’), : This line defines a column named category. The data type is ENUM, which allows you to restrict the data to a predefined set of options. In this case, the category can only be one of three options: ‘Electronics’, ‘Furniture’, or ‘Clothing’.
- ) : This closing parenthesis indicates the end of the column definitions for the Products table.
In summary, this SQL code creates a table to store product information including a unique identifier (id), name, detailed description, price, and a category to classify the products. It is recommended that you should learn SQL queries in advance but it is out of scope in this tutorial.
If you are following the steps, now you should copy and paste the above SQL query into the “Editor1” tab. It will look like the screenshot below:
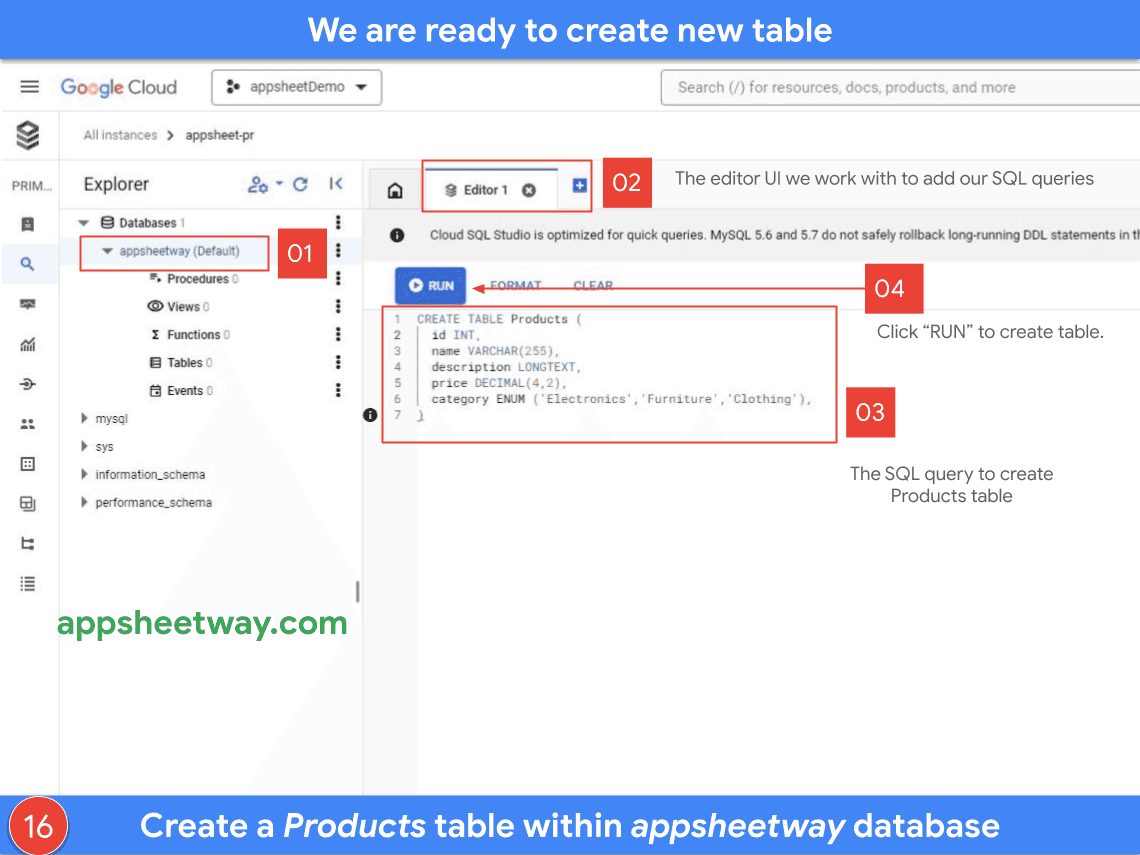
When clicking the “RUN” button, the RESULTS will be shown right below of your current screen. If it is successful, you will see a message “Statement executed successfully” with a small green button.
Congratulations! You have successfully set up the MySQL database, creating a new table. Before heading to the next part, let’s wrap up what we’ve just done:
- We created a new user name as appsheetDemo. There is a password that is appropriate with this user.
- We created a database name as appsheetway.
- We create a table name as Products.
- There are 05 columns in the Products table; those are id, name, description, price and category.
It’s all set. We are now ready to set up our appsheetway database in Google Cloud SQL as a datasource for AppSheet Application.
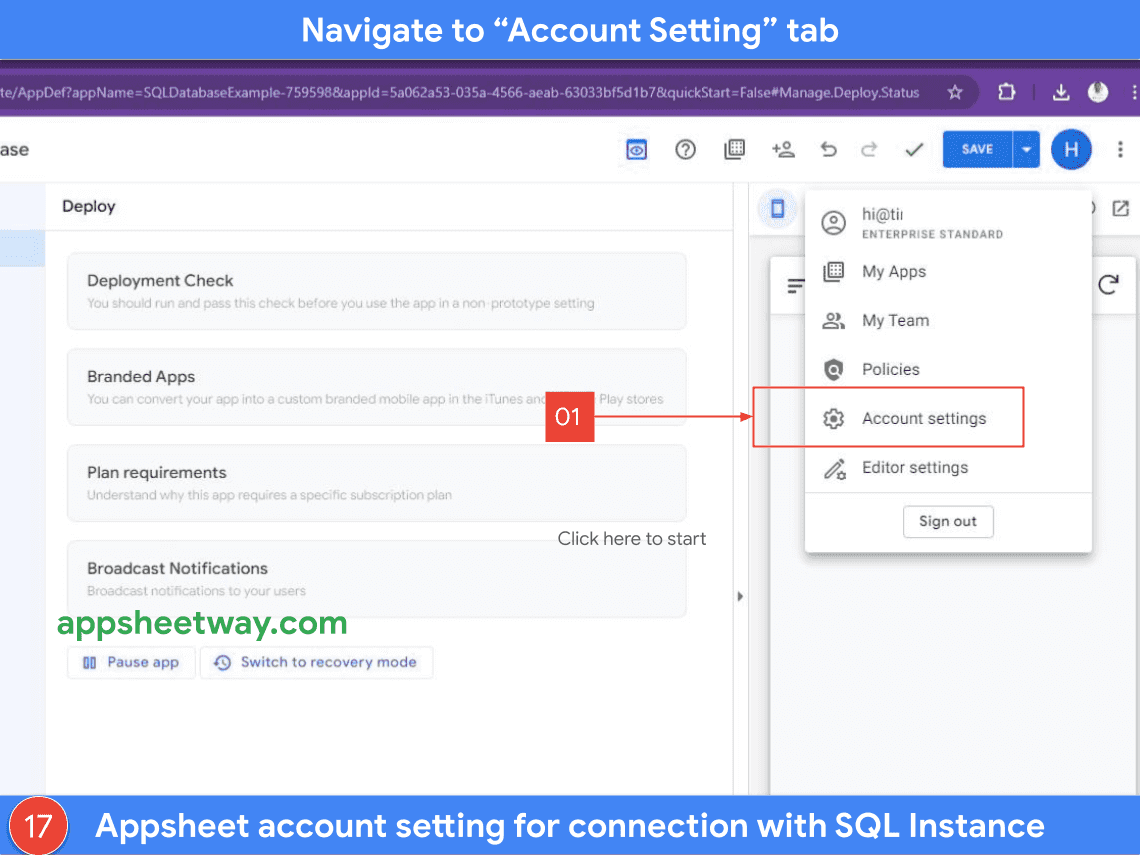
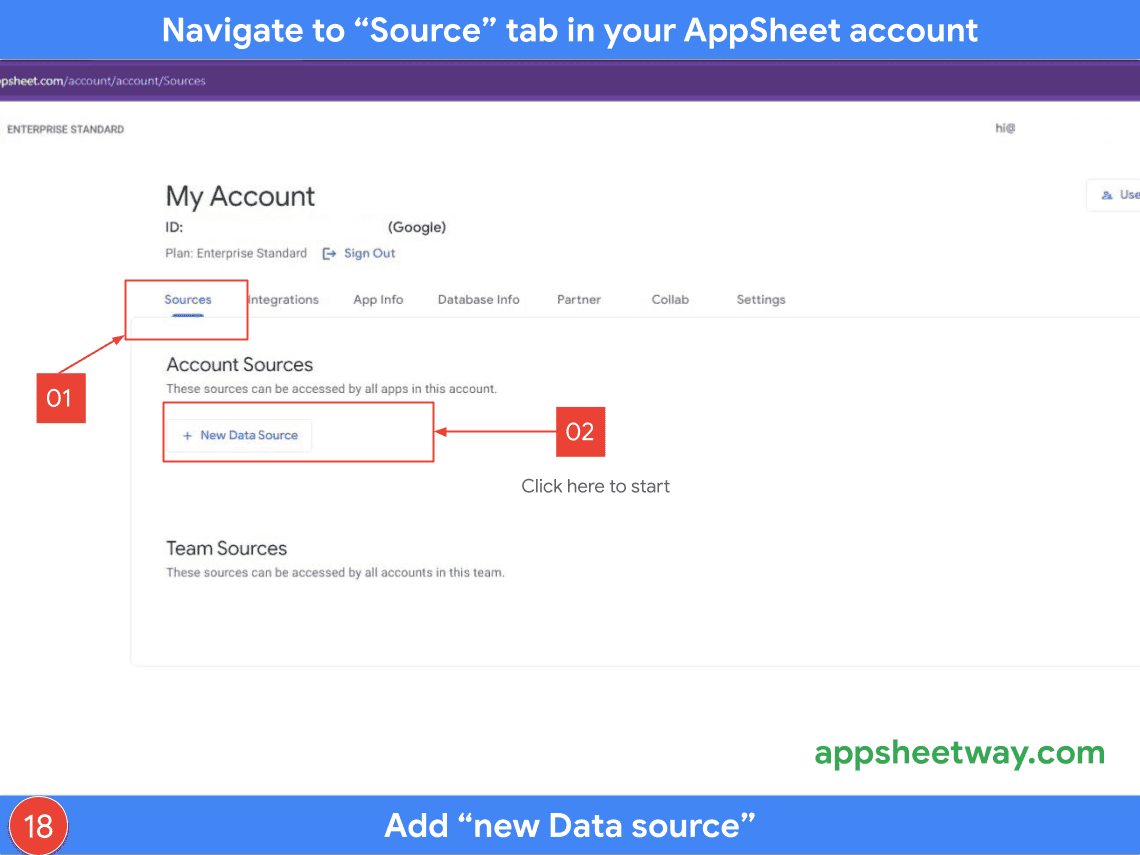
Firstly, we will navigate to the setting of our Appsheet account as the screenshot below:
In the next screen that is the detailed page of your AppSheet account, click to “Source”, then “New Data Source”.
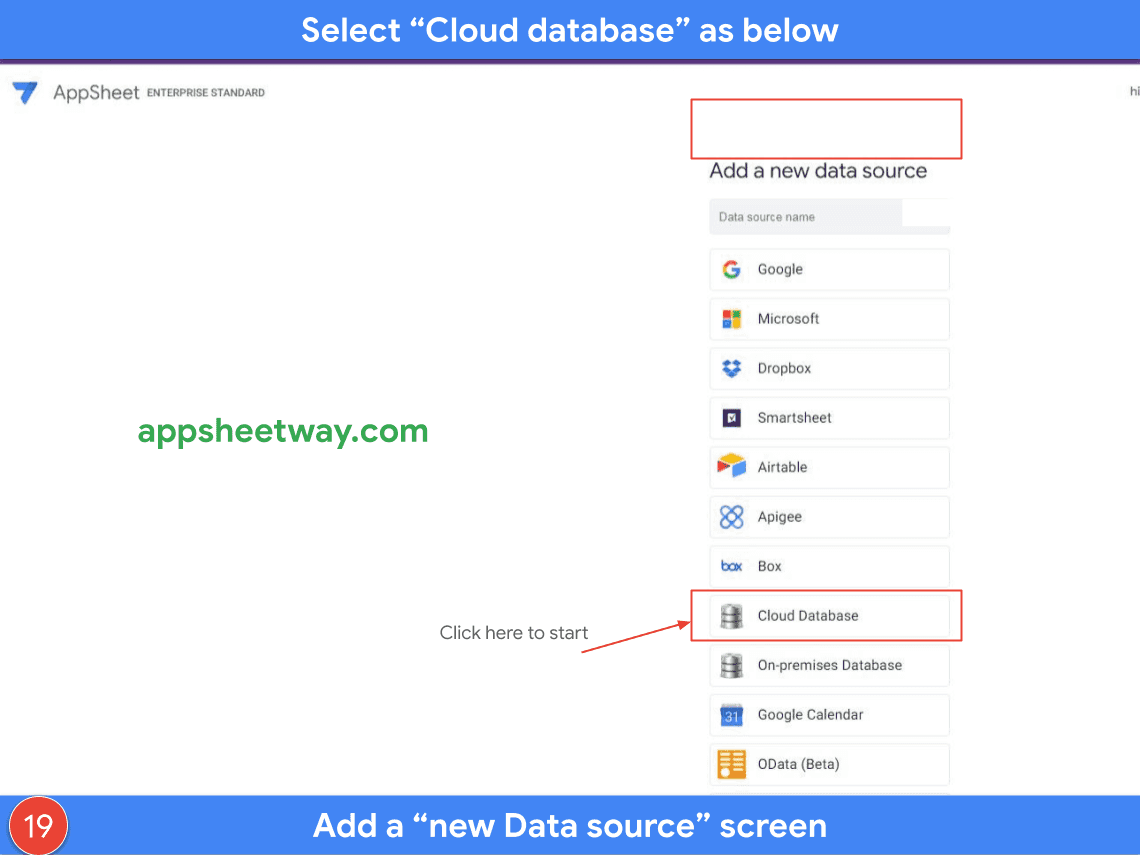
You then will be redirected to the screen of “Add a new data source”. From there, click to “Cloud database”.
You then will be redirected to the “Add database connection information” page. In this step, let you set the values as screenshot below:
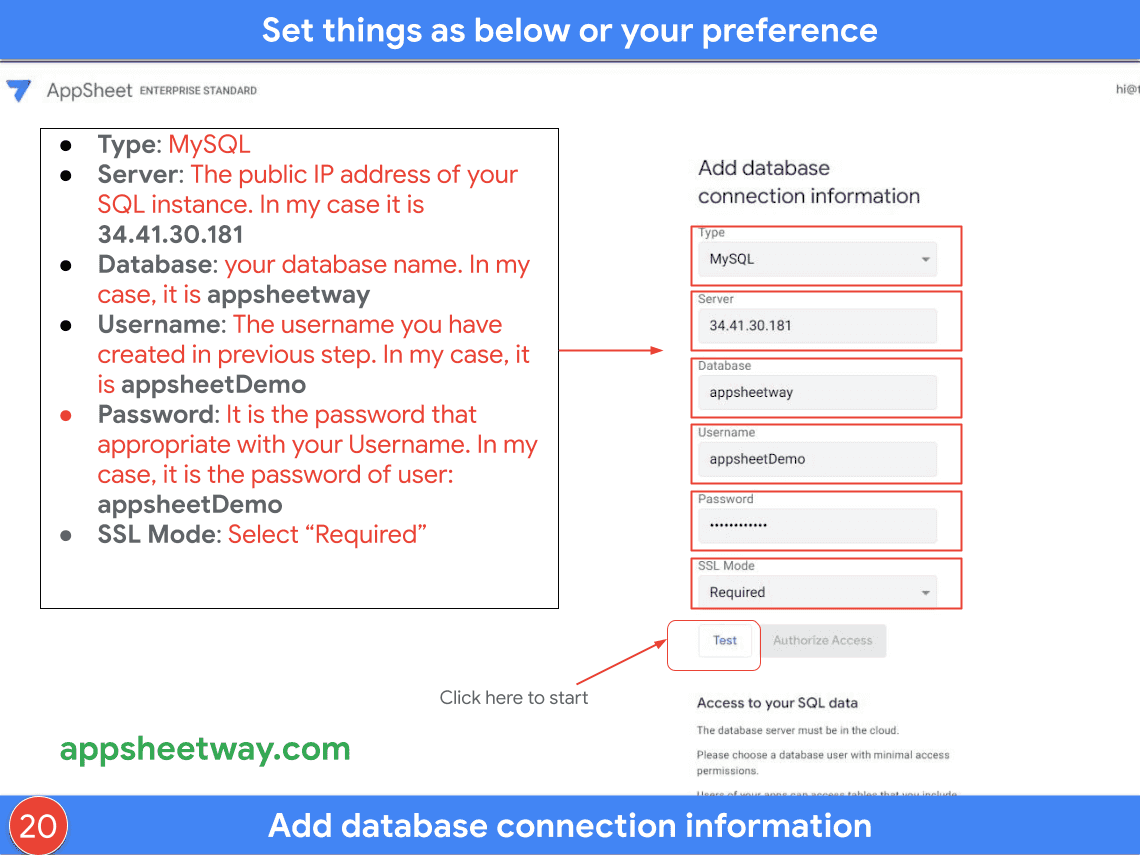
Be careful during the process of inputting data in this step. When all fields are filled, click the “Test” button.
If everything is correct, The Authorize Access button will be changed from gray to blue.
If you are able to click the Authorize Access button for now, then congratulations!!!. You just make the connection successfully between your MySQL database in Google Cloud SQL instance with your AppSheet account.
From now on, you can use the newly added database within all of your Appsheet applications. In my case, it is an appsheetway database and there is the Products table in this database. Imagine that if we have created many tables such as Products, Clients, Orders…etc in the previous step, then when making the connection successfully between our appsheetway database with any Appsheet application, we will be able to use all of the created tables in our application. It is similar to what we usually do when using Google Sheets as a database.
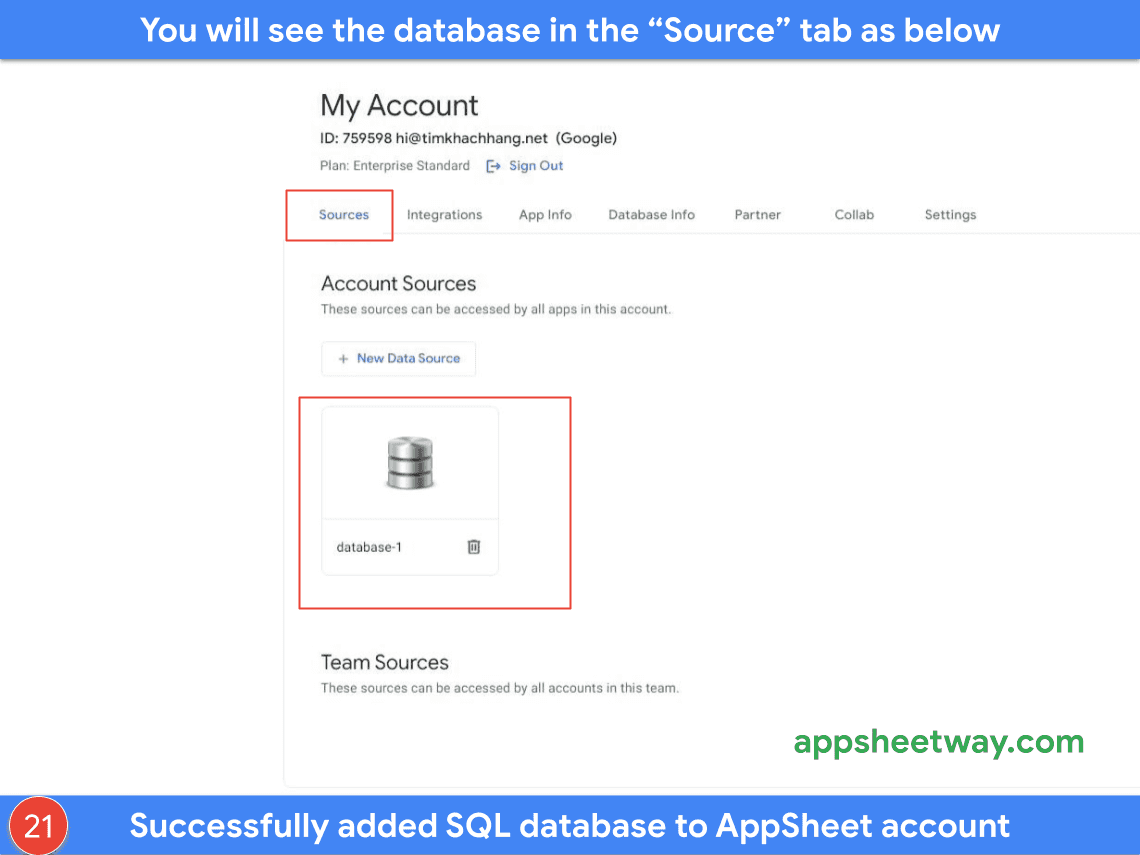
Below are the screenshots when you successfully added the database to your appsheet account.
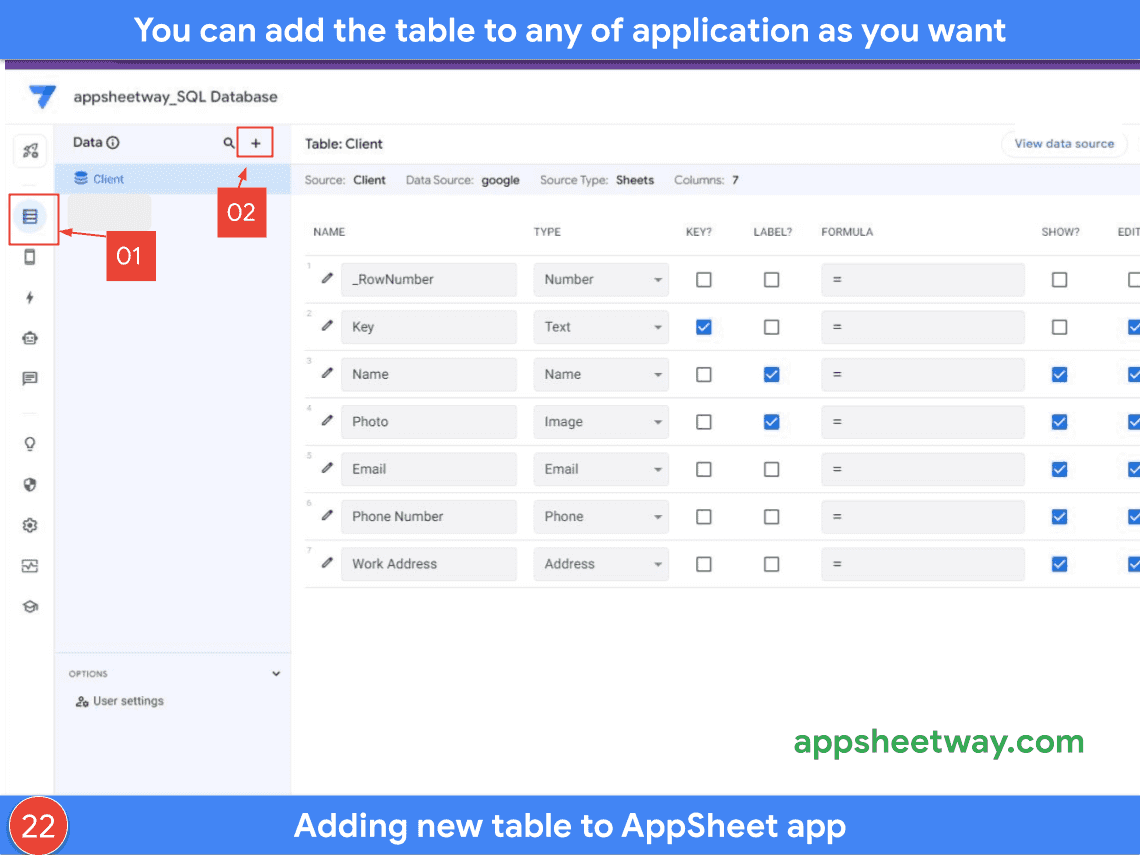
We are now ready to add the Products table (or your own table) into a particular appsheet application.
Now open any AppSheet application you want to add the Products table in, then navigate to the Data section, then click to (+) button. In my case, my AppSheet app is appsheetway_SQL Database. Following below images to finish this process:
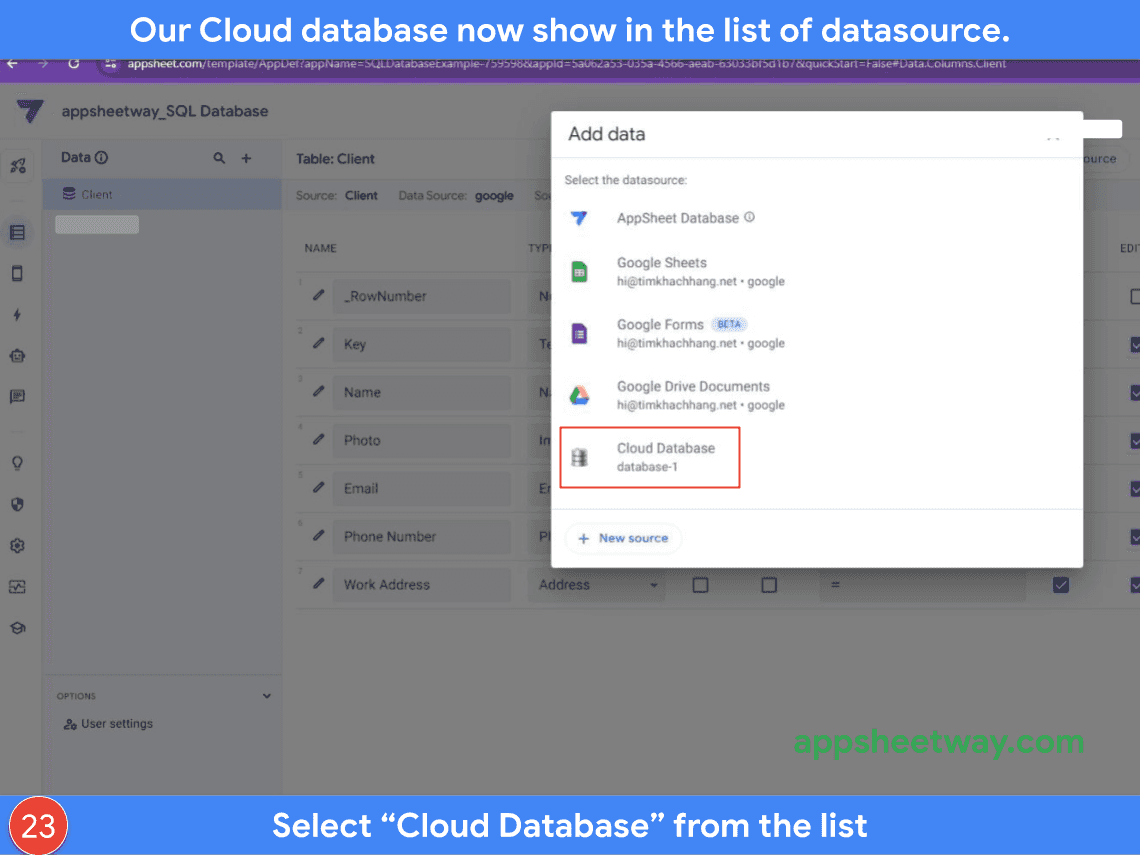
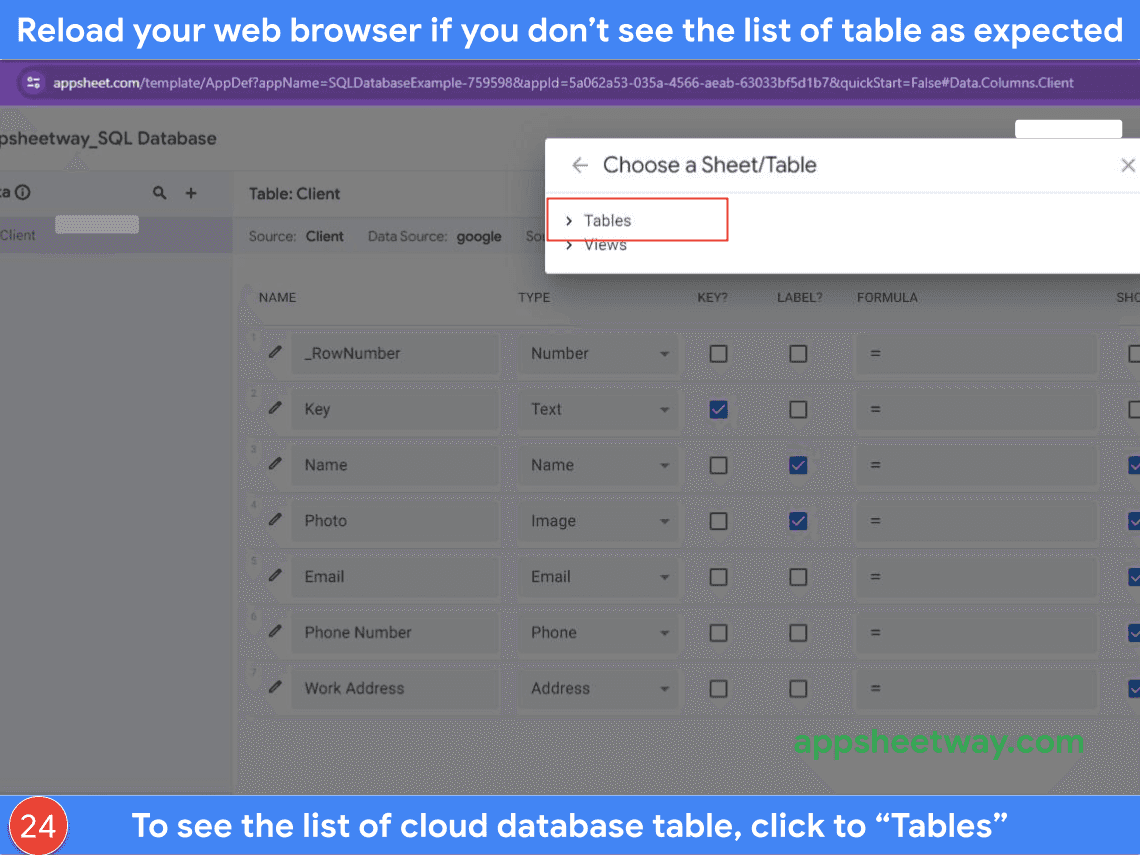
When the new has appeared, click to “Cloud Database”, then click to the Tables. If it is work, you will be able to see the Products table in the Tables tab. If you don’t see the Products table, you should reload your web browser.
Click “Tables” to see the list of cloud database tables in the AppSheet app.
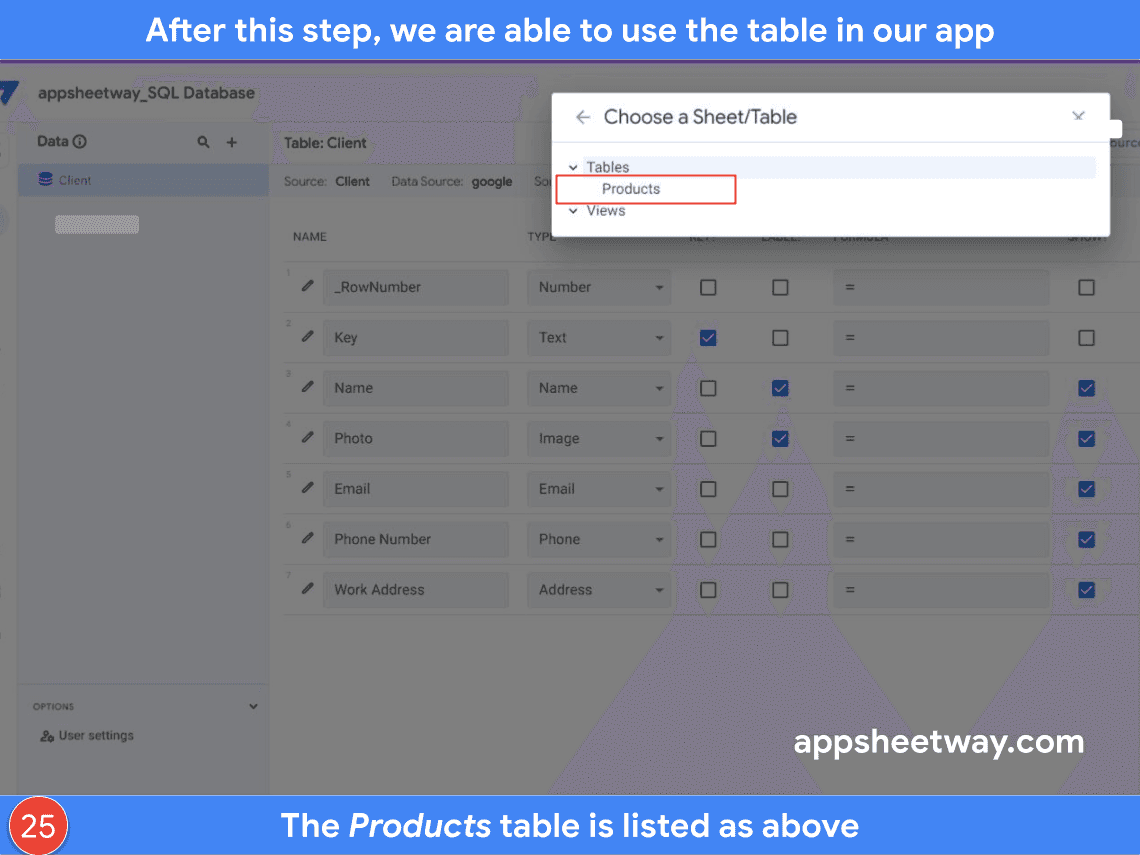
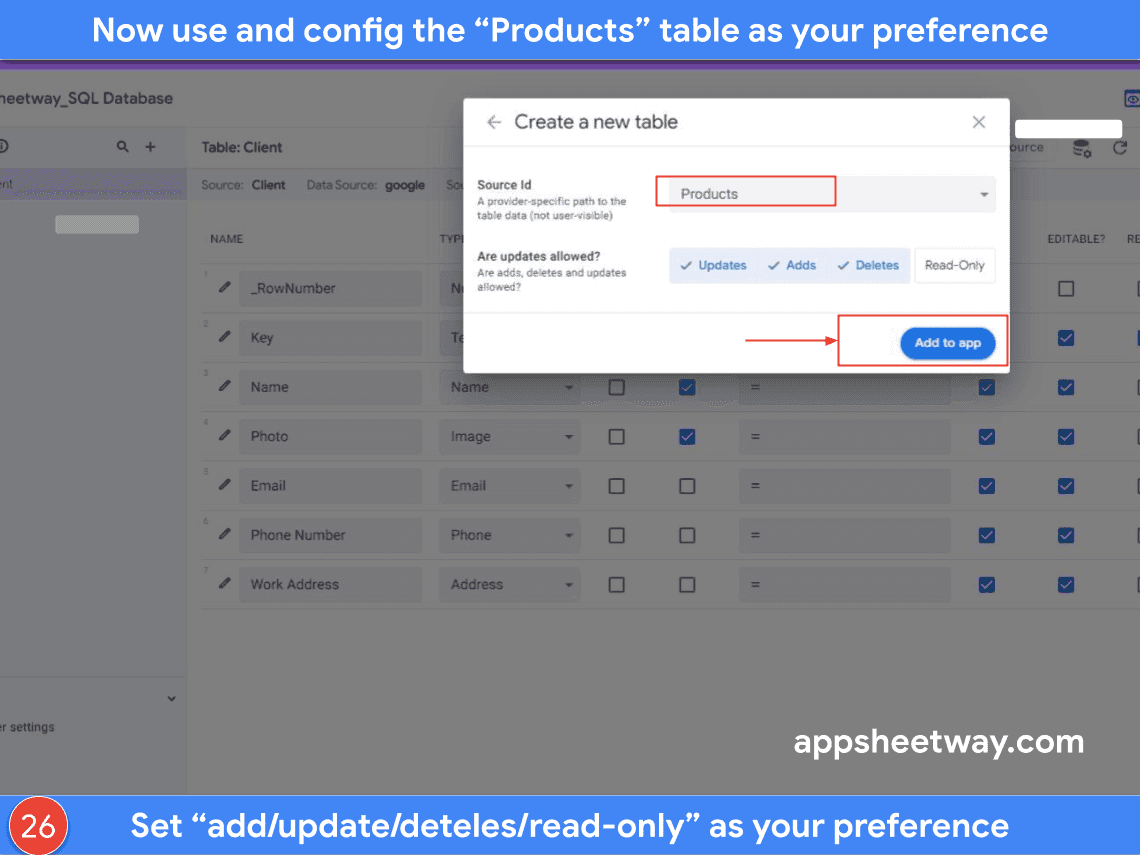
The Products table is shown as screenshot below:
You now use and configure the Products table as when using a Google Sheet table. For example, you can set Updates, Adds, Deletes, Read-Only as screenshot below:
- We walk through the detailed steps of how to set up a new Google SQL Instance then to create a new database within the instance, then to make a connection between the SQL instance with the AppSheet account, and finally we can use a table in MySQL database that is hosted on Google Cloud Instance as a Datasource for our application.
Quick Links
Legal Stuff